
Loading...
Loading...
Loading...
Loading...
Loading...
Loading...
Loading...
Loading...
Loading...
Loading...
Loading...
Loading...
Loading...
Loading...
Loading...
Loading...
Loading...
Loading...
Loading...
Loading...
Loading...
Loading...
Loading...
Loading...
Loading...
Loading...
Loading...
Loading...
Loading...
Loading...
Loading...
Loading...
Loading...
TanStact Start is TanStack Router + server capabilites. It's a full stack framwork.
TanStack Start has a special status since your getting both the frontend and backend capabilities of oidc-spa integrated in a single adapter!
TanStack StartTanStack Router as a library, without the server functionality. It's a library for SPAs
TanStack RouterNote: is optional but highly recommended. Writing validators manually is error-prone, and skipping validation means losing early guarantees about what your auth server provides.
Add the plugin to your vite.config.ts:
You should be able to learn everything there is to know by checkout out !
You're journey will start by looking at src/oidc.ts.
npx gitpick keycloakify/oidc-spa/tree/main/examples/tanstack-start start-oidc
cd start-oidc
npm install
npm run dev

# By default, the example runs against Keycloak.
# You can edit the .env file to test other providers.npm install oidc-spa zodyarn add oidc-spa zodpnpm add oidc-spa zodbun add oidc-spa zodimport { defineConfig } from "vite";
import { tanstackStart } from "@tanstack/react-start/plugin/vite";
import viteReact from "@vitejs/plugin-react";
import viteTsConfigPaths from "vite-tsconfig-paths";
import tailwindcss from "@tailwindcss/vite";
import { oidcSpa } from "oidc-spa/vite-plugin";
export default defineConfig({
plugins: [
viteTsConfigPaths({ projects: ["./tsconfig.json"] }),
tailwindcss(),
tanstackStart(),
oidcSpa(),
viteReact(),
],
});oidc-spa is a framework-agnostic OpenID Connect client for browser-centric web applications implementing the Authorization Code Flow with PKCE.
It work with any spec compliant OIDC provider like Keycloak, or and replace provider-specific SDKs like , , or with one unified API, freeing your app from vendor lock-in and making it deployable in any IT system. Concretly this mean that it let you build an app and sell it to different companies ensuring they will be able to deploy it in their environement regardless of what auth plafrom they use internally.
oidc-spa provides strong guarantees regarding the protection of your tokens . No other implementation can currently claim that.
It is uncompromising in terms of performance, security, DX, and UX. You get a state-of-the-art authentication and authorization system out of the box with zero glue code to write and no knobs to adjust.
Unlike server-centric solutions such as , oidc-spa makes the frontend the OIDC client in your IdP model's representation.
Your backend becomes a simple OAuth2 resource server that you frontend query with the access token attached as Authorization header. oidc-spa also provides the tools for token validation on the server side:
As an unified solution for
Or, as for creating authed APIs with , , , , ect.
That means no database, no session store, and enterprise-grade UX out of the box, while scaling naturally to edge runtimes.
oidc-spa exposes real OIDC primitives, decoded ID tokens, access tokens, and claims, instead of hiding them behind a “user” object, helping you understand and control your security posture.
It’s infra-light, open-standard, transparent, and ready to work in minutes.
You can skip this for now since all our examples comes with demo Keycloak/Auth0/EntraID/Google accounts that you can freely use for development. Eventually however you'll need to configure your own account/instance.
At its core, oidc-spa is a framework-agnostic solution for client-centric web applications. It’s not tied to any specific UI framwork.
In an effort to minimize the amount of glue code you have to write we also provide framework-specific adapters for popular environments.
Pick one:
has a special status since your getting both the frontend and backend capabilities of oidc-spa integrated in a single adapter!
Another big difference: oidc-spa is browser-centric. The token exchange happens on the client, and the backend server is merely an OAuth2 resource server in the OIDC model.
If you use BetterAuth to provide login via Keycloak, your backend becomes the OIDC client application, which has some security benefits over browser token exchange, but at the cost of centralization and requiring backend infrastructure.
One clear advantage BetterAuth has over oidc-spa is more natural SSR support. In the oidc-spa model, the server doesn’t know the authentication state of the user at all time, which makes it difficult to integrate with traditional full-stack frameworks that rely on server-side rendering.
Server Side Rendering
The only SSR-capable framework we currently support is TanStack Start, because it provides the low-level primitives needed to render as much as possible on the server while deferring rendering of auth aware components to the client.
This approach achieves a similar UX and performance to server-centric frameworks, but it’s inherently less transparent than streaming fully authenticated components to the client.
Try the TansStack Start example deployment with JavaScript disabled to get a feel of what can and can't be SSR'd: https://example-tanstack-start.oidc-spa.dev/
Security and XSS resilience
Yes; client-side authentication raises valid security concerns. But this isn’t a fatal flaw; it’s an engineering challenge, and oidc-spa addresses it head-on.
It treats the browser as a hostile environment, going to great lengths to protect tokens even under XSS or supply-chain attacks. These mitigations are documented here.
Limitations regarding backend delegation
The main limitation is with long-running background operations. If your backend must call third-party APIs on behalf of the user while they’re offline, you’ll need service accounts for those APIs or take charge of rotating tokens yourself which can be tricky. Beyond that, everything else scalability, DX, performance, works in your favor.
If that all sounds good to you… Let’s get started.
npm install oidc-spa zodyarn add oidc-spa zodpnpm add oidc-spa zodbun add oidc-spa zodNote: Zod is optional but highly recommended. Writing validators manually is error-prone, and skipping validation means losing early guarantees about what your auth server provides. You can use another validator though, it doesn't have to be Zod.
In Vite apps, this is done through a Vite Plugin (If you'd rather avoid using the Vite plugin checkout the Other SPAs tab).
First rename your entry point file from main.tsx (or main.ts or whatever it is) to main.lazy.tsx
Then create a new index.tsx file:
If you don't have a precise entrypoint that you can simply override, just call oidcEarlyInit as soon as possible and try canceling as much work as possible when shouldLoadApp is false.
You're going to be cloning this example:
TanStack Router has pick the one for you:
Comming Soon
Now that authentication is handled, there’s one last piece of the puzzle: your resource server, the backend your app will communicate with.
This can be any type of service: a REST API, tRPC server, or WebSocket endpoint, as long as it can validate access tokens issued by your IdP.
If you’re building it in JavaScript or TypeScript (for example, using Express), oidc-spa provides ready-to-use utilities to decode and validate access tokens on the server side.
You’ll find the full documentation here:
Technically, it works now, but there are still a few ways the "OAuth" feature in Clerk needs to be improved to fully comply with the standard so that generic clients work seamlessly. The team has been very helpful so far and already fixed the most critical issues. Once the remaining problems are addressed, I’ll update this page.
If you want to use it today, here are the required workarounds:
Set
Set if you need the access token to be a JWT (by default, the issued access token is opaque)
In the Clerk admin, make sure the consent pages are not enabled
Let's get your App authenticated!
Gracefully handle authentication issues
What happens if your OIDC server is down or misconfigured? This guide explains how to debug your setup during development and handle errors gracefully in production.
To better understand what’s going on under the hood, enable debug logs in your configuration. This will print detailed information to your browser console about OIDC initialization, token validation, and redirects.
Backers of the project
oidc-spa/react-spa than from oidc-spa/core.In that case, follow the React Router integration guide in Declarative Mode, it should be easy to adapt to your setup.
npm install oidc-spayarn add oidc-spapnpm add oidc-spabun add oidc-spaTo protect tokens against supply-chain attacks and XSS, oidc-spa must run some initialization code before any other JavaScript in your app.
This design provides much stronger security guarantees than any other adapter, and it also delivers unmatched login performance. More details here.
In Vite apps, this is done through a Vite Plugin (If you'd rather avoid using the Vite plugin checkout the Other SPAs tab).
import { defineConfig } from "vite";
import { oidcSpa } from "oidc-spa/vite-plugin";

export default defineConfig({
    plugins: [
        // ...
First rename your entry point file from main.tsx (or main.ts or whatever it is) to main.lazy.tsx
mv src/main.ts src/main.lazy.tsThen create a new index.tsx file:
import { oidcEarlyInit } from "oidc-spa/entrypoint";

const { shouldLoadApp } = oidcEarlyInit({
    BASE_URL: "/" // The path where your app is hosted, can also be provided later to createOidc()
});
If you don't have a precise entrypoint that you can simply override, just call oidcEarlyInit as soon as possible and try canceling as much work as possible when shouldLoadApp is false.
For certain use cases, you may want a mock adapter to simulate user authentication without involving an actual authentication server.
This approach is useful when building an app where user authentication is a feature but not a requirement. It also proves beneficial for running tests or in Storybook environments.
Now that authentication is handled, there’s one last piece of the puzzle: your resource server, the backend your app will communicate with.
This can be any type of service: a REST API, tRPC server, or WebSocket endpoint, as long as it can validate access tokens issued by your IdP.
If you’re building it in JavaScript or TypeScript (for example, using Express), oidc-spa provides ready-to-use utilities to decode and validate access tokens on the server side.
You’ll find the full documentation here:
Oidc.provide({
  // ...
  debugLogs: true
});
Once enabled, make sure to check "Preserve Log" in your browser’s console options so the logs aren’t cleared during redirects.
Here’s a common example: If you see a message like this in the console, it usually means your Valid Redirect URIs list in your IdP configuration is incomplete:
In this case, simply add http://localhost:3000/ (or the appropriate URL for your environment) to your list of valid redirect URIs in the IdP settings.
createOidc({
  // ...
  debugLogs: true
});bootstrapOidc({
// ...
debugLogs: true
});mv src/main.ts src/main.lazy.tsimport { defineConfig } from "vite";
import { oidcSpa } from "oidc-spa/vite-plugin";
export default defineConfig({
plugins: [
// ...
oidcSpa()
]
});import { oidcEarlyInit } from "oidc-spa/entrypoint";
const { shouldLoadApp } = oidcEarlyInit({
BASE_URL: "/" // The path where your app is hosted, can also be provided later to createOidc()
});
if (shouldLoadApp) {
// Note: Deferring the main app import adds a few milliseconds to cold start,
// but dramatically speeds up auth. Overall, it's a net win.
import("./index.lazy");
}If you are using an OIDC provider other than the ones for which we have a specific guide, follow these general instructions to configure your OIDC provider.
Create a Public OpenID Connect client.
OpenID Connect clients may also be referred to as OIDC clients or OAuth clients.
The technical term for a public OIDC client is Authorization Code Flow + PKCE.
If provided with the option, disable client credentials—you do not need to provide a client secret to oidc-spa.
Some providers will ask you to select an application type and choose between Single Page Application (SPA), Web Application (or Web Server App), and Mobile App. Select SPA.
You may need to explicitly provide a Client ID, or it may be generated automatically. This is the clientId parameter required by oidc-spa.
Valid Redirect URIs: https://my-app.com/ and http://localhost:5173/
The trailing slash (/) is important.
If your app is hosted on a subpath (e.g., /dashboard), set:
https://my-app.com/dashboard/ and http://localhost:5173/dashboard/
Valid Post-Logout Redirect URIs: Use the same values as the Valid Redirect URIs.
Web Origins: https://my-app.com, http://localhost:5173
issuerUri?The issuer URI is not always clearly documented—it depends on the provider.
If you are given a Discovery URL like:
Then your issuerUri is:
If you suspect a URL might be the issuer URI but are unsure, append /.well-known/openid-configuration to it and open it in a web browser. If it returns a JSON response, then you have found your issuer URI!
Some OIDC providers require the client (oidc-spa) to explicitly request a specific scope or audience to issue a JWT access token.
Unfortunately, the configuration varies significantly between providers.
For example:
Auth0 requires you to .
Microsoft Entra ID requires you to .
Feeling a bit lost? Have a question? A feature request? Reach out on Discrord!
Why Doesn't oidc-spa Require a Client Secret?
You might be wondering why oidc-spa doesn’t require a client secret and how it securely authenticates users without a backend handling the token exchange with the OIDC provider.
The key lies in the difference between Authorization Code Flow, which requires a client secret, and Authorization Code Flow with PKCE, which does not.
OIDC defines two common variants of the Authorization Code Flow:
import { createOidc } from "oidc-spa/core";
import { z } from "zod";

const oidc = await createOidc({
    issuerUri: "https://auth.your-domain.net/realms/myrealm",
    clientId: "myclient",
    //scopes: ["profile", "email", "api://my-app/access_as_user"],
    extraQueryParams: () => ({
       ui_locales: "en" // Keycloak login/register pages language
       //audience: "https://my-app.my-company.com/api"
    }),
    // This is declarative, you declare what you will use and what
    // infos you expect to be present in the id token.
    // if you don't know what's in your id token open the console
    // if you have debugLogs set to true you'll see.
    decodedIdTokenSchema: z.object({
       preferred_username: z.string(),
       name: z.string()
       email: z.string().email().optional(),
       picture: z.string().optional(),
       email: z.string().email().optional(),
       realm_access: z.object({ roles: z.array(z.string()) }).optional()
    }),
    debugLogs: true
});

if (!oidc.isUserLoggedIn) {
    // The user is not logged in.

    // We can call login() to redirect the user to the login/register page.
    // This return a promise that never resolve.
    oidc.login({
         /**
          * If you are calling login() in the callback of a click event
          * set this to false.
          * If you are calling this because the user has navigated to
          * a route that requires them to be logged in, set this to true.
          */
         doesCurrentHrefRequiresAuth: false
         /**
          * Optionally, you can add some extra parameter
          * to be added on the login url.
          * (Can also be a parameter of createOidc `extraQueryParams: ()=> ({ ui_locales: "fr" })`)
          */
         //extraQueryParams: { kc_idp_hint: "google", ui_locales: "fr" }
         /**
          * You can allso set where to redirect the user after
          * successful login but by default it's the current url
          * which is usually what you want.
          */
          // redirectUrl: "/dashboard"
    });

    // oidc-spa export keycloak specific tooling:
    const { isKeycloak, createKeycloakUtils } = await import("oidc-spa/keycloak");

    // If your IdP is a Keycloak
    if( isKeycloak({ issuerUri: oidc.issuerUri }) ){
        const keycloakUtils = createKeycloakUtils({ issuerUri: oidc.params.issuerUri });
        // Redirect directly to the register page instead of the login page
        oidc.login({
            doesCurrentHrefRequiresAuth: false,
            transformUrlBeforeRedirect: keycloakUtils.transformUrlBeforeRedirectForRegister
        });

    }


} else {
    // The user is logged in.

    const {
        // The accessToken is what you'll use as a Bearer token to
        // authenticate to your APIs
        accessToken
    } = await oidc.getTokens();

    // oidc-spa also provide the toold to create such an API.
    fetch("https://api.your-domain.net/orders", {
        headers: {
            Authorization: `Bearer ${accessToken}`
        }
    })
     .then(response => response.json())
     .then(orders => console.log(orders));

    // To call when the user click on logout.
    // You can also redirect to a custom url with
    // { redirectTo: "specific url", url: "/bye" }
    oidc.logout({ redirectTo: "home" });

    const decodedIdToken = oidc.getDecodedIdToken();

    console.log(`Hello ${decodedIdToken.preferred_username}`);

    // Get a link to the account page:
    const userAccountUrl = keycloakUtils.getAccountUrl({
        clientId: oidc.params.issuerUri,
        validRedirectUri: oidc.params.validRedirectUri
    });

}import { createOidc } from "oidc-spa/core";
import { createMockOidc } from "oidc-spa/mock";
import { z } from "zod";
const decodedIdTokenSchema = z.object({
sub: z.string(),
preferred_username: z.string()
});
const autoLogin = false;
const oidc = !import.meta.env.VITE_OIDC_ISSUER
? await createMockOidc({
// NOTE: If autoLogin is set to true this option must be removed
isUserInitiallyLoggedIn: false,
mockedTokens: {
decodedIdToken: {
sub: "123",
preferred_username: "john doe"
} satisfies z.infer<typeof decodedIdTokenSchema>
},
autoLogin
})
: await createOidc({
issuerUri: import.meta.env.VITE_OIDC_ISSUER,
clientId: import.meta.env.VITE_OIDC_CLIENT_ID,
decodedIdTokenSchema,
autoLogin
});npx gitpick keycloakify/oidc-spa/tree/main/examples/tanstack-router-file-router tr-oidc
cd tr-oidc
# You can use our preconfigured Keycloak, Auth0, or Google OAuth test accounts
cp .env.local.sample .env.local
npm install
npm run dev
# Start exploring with: src/oidc.tsPort 5173 is the default for the Vite dev server; adjust as needed for your setup.
https://XXX/.well-known/openid-configurationhttps://XXXIn Vite apps, this is done through a Vite Plugin (If you'd rather avoid using the Vite plugin checkout the Other SPAs tab).
import { defineConfig } from "vite";
import { oidcSpa } from "oidc-spa/vite-plugin";

export default defineConfig({
    plugins: [
        // ...
First rename your entry point file from main.tsx (or main.ts or whatever it is) to main.lazy.tsx
mv src/main.ts src/main.lazy.tsThen create a new index.tsx file:
import { oidcEarlyInit } from "oidc-spa/entrypoint";

const { shouldLoadApp } = oidcEarlyInit({
    // See: https://docs.oidc-spa.dev/resources/token-exfiltration-defence
    enableTokenExfiltrationDefense: false,
    BASE_URL
If you don't have a precise entrypoint that you can simply override, just call oidcEarlyInit as soon as possible and try canceling as much work as possible when shouldLoadApp is false.
You're going to be cloning this example:
React Router v7 has three modes pick the one for you:
IMPORTANT NOTICE:
Because React Router Framwork does not expose a true entrypoint oidc-spa won't let you set enableTokenExfiltrationDefense to true. Since this specific framwork do not give us a way to harden the environement before any other JS is evaluated we can't protect agaist token exfiltration effectively. Note however that even without exfiltration defense, oidc-spa is state of the art in implementing all CBP. You app will pass any security audit.
This is non optional. React Router Framework does not expose the primitives to enable solution like oidc-spa to provide a full stack story. (You may want to give a try, it's the same thing than React Router Framwork but better.w)
Now that authentication is handled, there’s one last piece of the puzzle: your resource server, the backend your app will communicate with.
This can be any type of service: a REST API, tRPC server, or WebSocket endpoint, as long as it can validate access tokens issued by your IdP.
If you’re building it in JavaScript or TypeScript (for example, using Express), oidc-spa provides ready-to-use utilities to decode and validate access tokens on the server side.
You’ll find the full documentation here:
npm install oidc-spa zodyarn add oidc-spa zodpnpm add oidc-spa zodbun add oidc-spa zodAuthorization Code Flow: Requires a backend to perform the token exchange, since a client secret is needed to securely obtain tokens. In this model, the server acts as the OIDC client application. Frameworks like NextAuth follow this approach. The resulting access token is mostly incidental, it's used only if we need to call third party APIs.
Authorization Code Flow with PKCE: Adds an additional verification step that removes the need for a client secret, enabling secure token exchange directly from the browser. This is the flow implemented by oidc-spa. Here, the frontend itself is the OIDC client application, and the access token is used as a key to make authenticated requests to a backend that otherwise has no built-in knowledge of authentication.
This flow is typically implemented as follows:
The frontend initiates authentication but does not exchange the authorization code directly.
Instead, the backend receives the authorization code and uses a client secret to exchange it for tokens.
The backend stores the access and refresh tokens in a database.
The backend issues an HttpOnly session cookie to the frontend.
The frontend communicates with the backend, which retrieves and attaches access tokens to API requests using the session identifier stored in the cookie.
The standard Authorization Code Flow alone is insufficient for securely exchanging tokens directly from the browser, as it requires a client secret. Since anything embedded in frontend code is not truly secret, a different approach is needed.
This is where PKCE (Proof Key for Code Exchange) comes in. Here’s how it works with oidc-spa:
When the user needs to log in, either by clicking a "Login" button or by navigating to a protected part of the app, oidc-spa redirects them to the OIDC provider's login page (e.g., Keycloak, Auth0).
After successful authentication, the OIDC provider establishes a session, sets an HttpOnly session cookie in the browser, and redirects the user back to the app with an authorization code.
oidc-spa exchanges this code for tokens, completing a cryptographic challenge that eliminates the need for a client secret.
Tokens remain in memory only, oidc-spa does not store them in localStorage, sessionStorage, or a backend database.
When the user refreshes the page or revisits the app, oidc-spa restores the session by querying the OIDC provider in the background.
The OIDC provider uses the session cookie to determine whether the session is still valid. If it is, fresh tokens are issued without requiring the user to log in again.
If the session has expired, the user is redirected to the login page when accessing a protected area.
Note: You might be concerned about the use of cookies, but here we are referring to session cookies, which do not require GDPR consent and are always enabled in all browsers. A user who disables all cookies would not be able to use any website requiring authentication. Session cookies should not be confused with tracking cookies or third-party cookies.
✅ No persistent token storage – There’s no need to store user tokens in a backend database. The OIDC provider itself acts as the session store, meaning you only need to focus on securely deploying your OIDC server (if self-hosting).
✅ Fewer moving parts – Everything happens between oidc-spa and the OIDC provider, reducing the chances of misconfiguration.
Even if you're not entirely confident in your setup, as long as it works, you’ve implemented it correctly.
However, in this mode, tokens are exposed to the JavaScript client code, unlike when the token exchange is performed on the backend. This introduces a potential risk: XSS and supply chain attacks, where malicious code running on your website could attempt to steal tokens.
PKCE is a widely adopted open standard, supported by all major OIDC providers, and provides strong security guarantees without requiring a backend.
While a backend-based token exchange is theoretically more secure, in practice, it introduces additional attack surfaces and operational complexity. Every extra moving part is a potential point of failure or misconfiguration, and securing a backend against threats like token leakage, improper session management, and server-side vulnerabilities is a non-trivial task.
With the security measures implemented in oidc-spa, Authorization Code Flow + PKCE is not just the simpler approach, it is arguably the safer one in real-world scenarios. By eliminating the backend entirely, it reduces the risk of misconfiguration and ensures that authentication security is handled directly by the OIDC provider, which is purpose-built for this task.
Read more:
Implement "Login with Google"
With oidc-spa, you would typically use an OIDC Provider like Keycloak or Auth0 to centralize authentication and configure Google as an identity provider within Keycloak. This allows users to select "Google" as a login option.
That being said, if you really want to, you can configure oidc-spa directly with Google, as demonstrated in the following video:
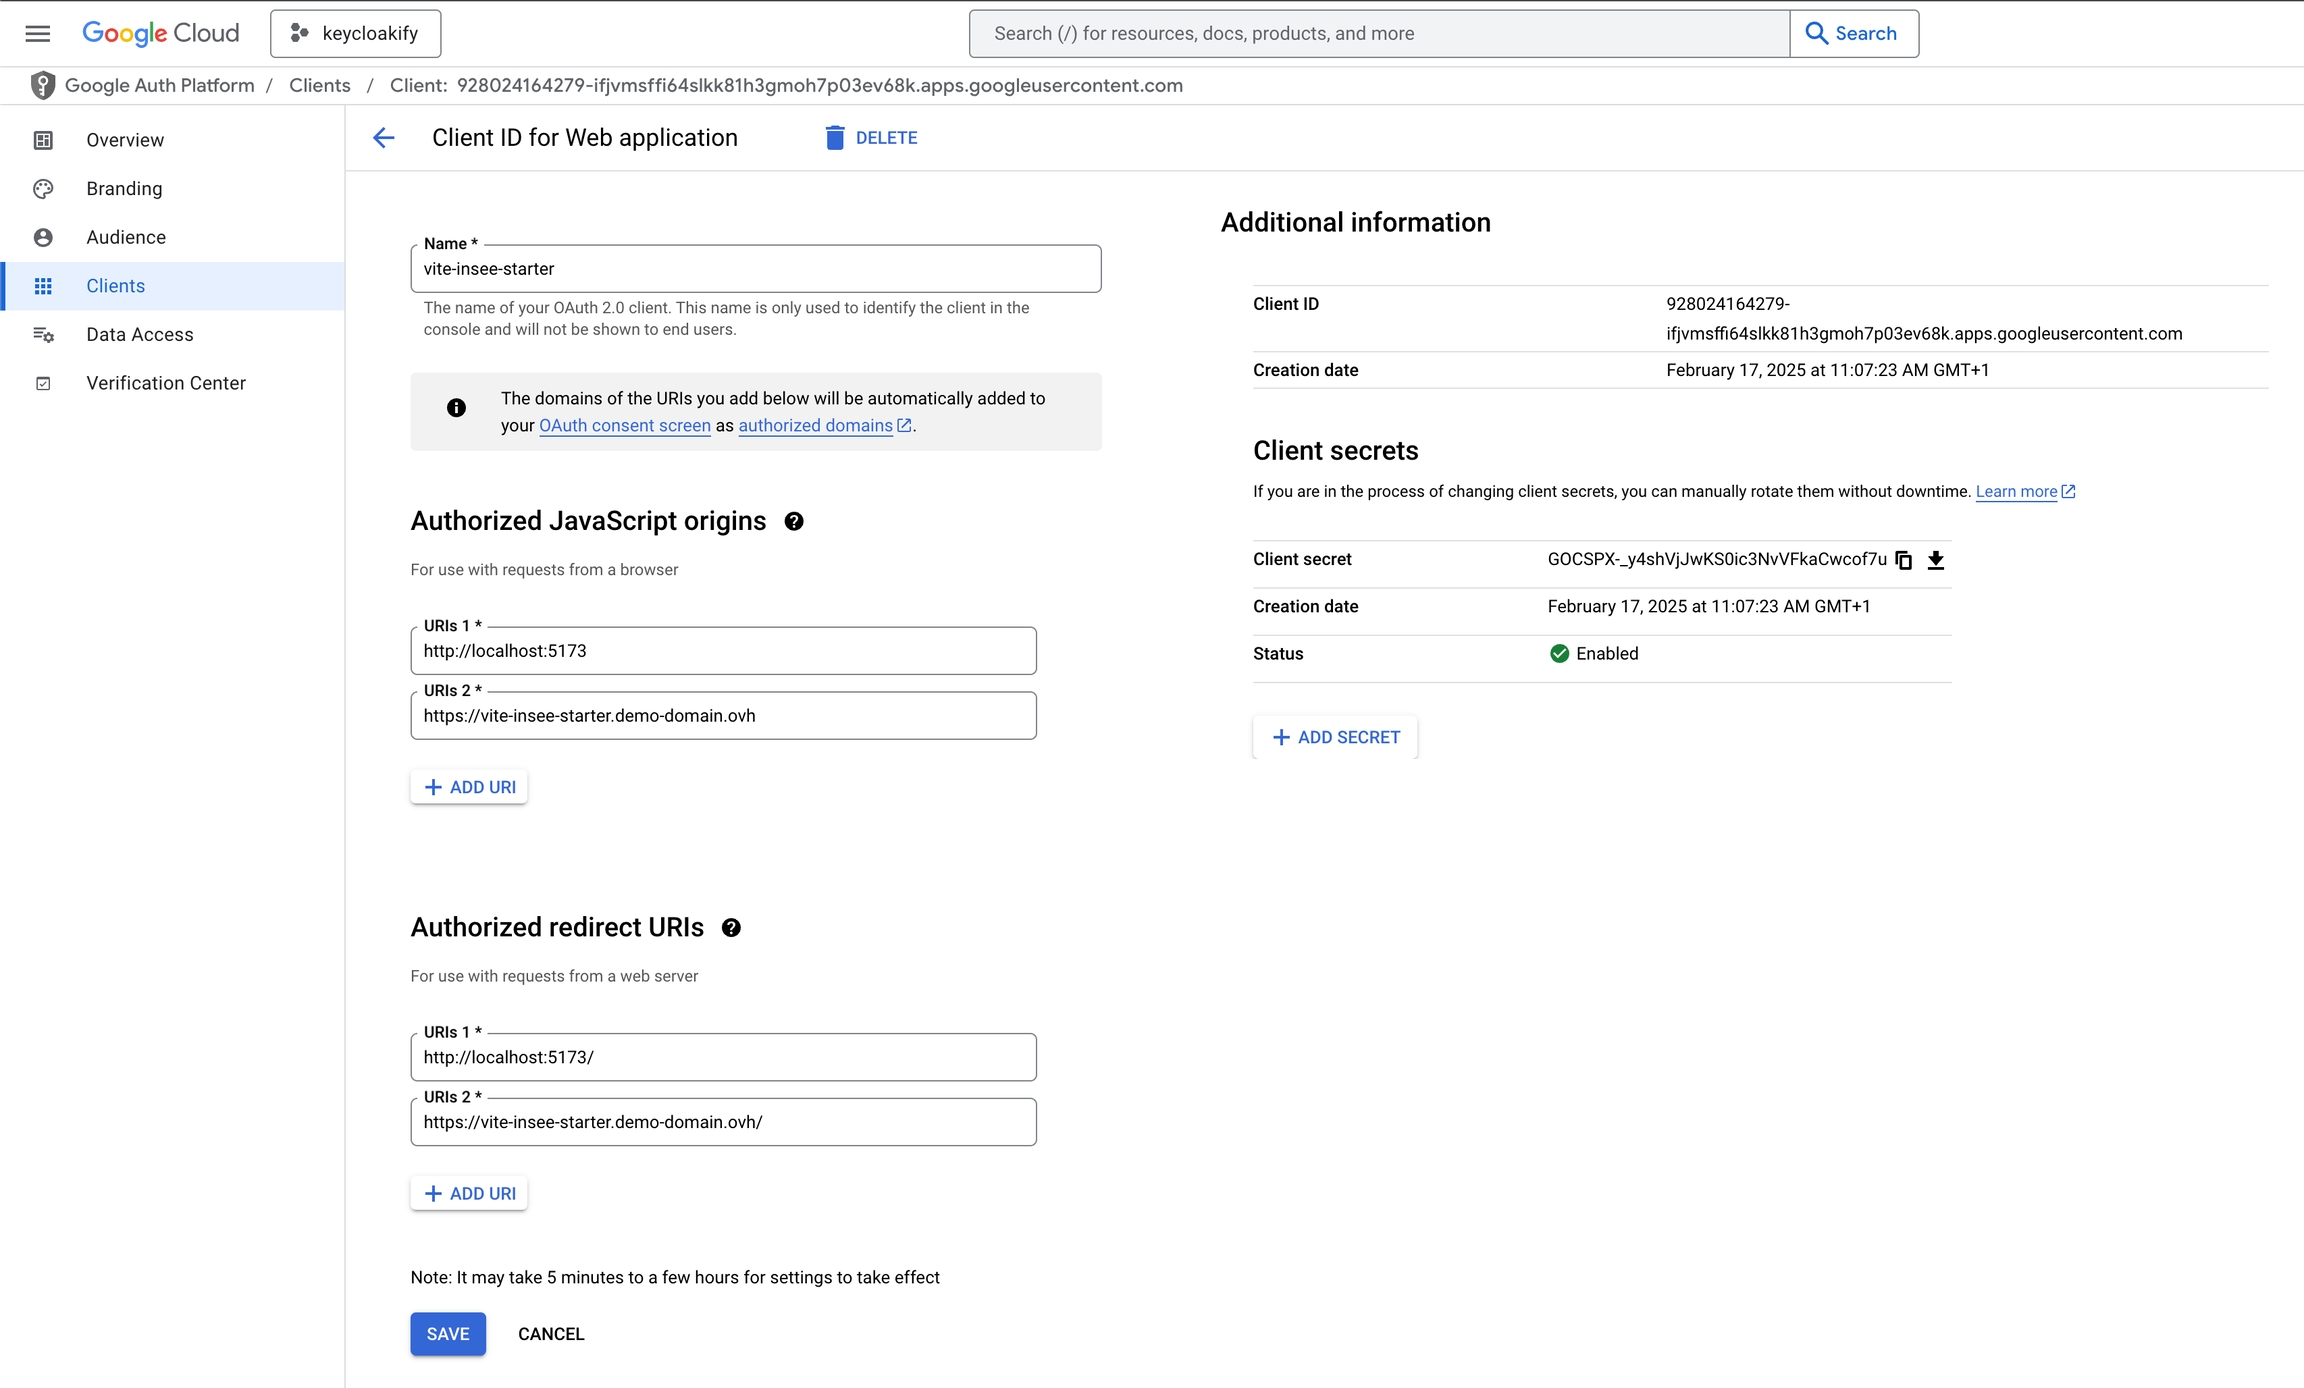
To set up authentication via Google, follow these steps in the Google Cloud Console:
Navigate to Google Cloud Platform Console.
Go to API & Services → Credentials.
Click Create Credentials → OAuth Client ID.
Choose Application Type: Web Application.
Client Secret
Google's OAuth implementation has a significant flaw: PKCE-based authentication fails unless a client secret is provided.
For public clients, storing secrets is inherently insecure. PKCE (Proof Key for Code Exchange) exists precisely to prevent code interception, and Google supports PKCE. Requiring a client secret in addition to PKCE is unnecessary and misleading.
That said, providing the client secret in your frontend code for this specific case has no security implications
Google do not issue JWT Access Tokens and there is no way to configure it so it does.
As a result, if you want to implement an API you'll have to call Google's special endpoint to validate the access token and get user infos. You won't be able to implement the standard approach for validating token described in the
Here’s how to configure oidc-spa to work with Google:
And why it's not supposed to be read on the client side.
You might be surprised, or even frustrated, that oidc-spa only provides the decoded ID token and not the decoded access token. This is intentional: the access token is meant to be opaque to the client application. It should be used only as an authentication key (e.g., a Bearer token when calling an API). According to the OAuth 2.0 specification, the access token is not even required to be a JWT:
The string is usually opaque to the client. [...] The token may denote an identifier used to retrieve the authorization information or may self-contain the authorization information in a verifiable manner (i.e., a token string consisting of some data and a signature).
The good news is that everything you need is usually found in the ID token. If you notice that certain information appears in the access token but not in the ID token, there are two likely reasons:
Identity server policy – Your identity provider may have an explicit rule stripping or not including those claims in the ID token. For example, Keycloak does not include the realm_access claim in the ID token by default.
Schema filtering – , any claims not declared in your schema will be discarded. This can make it seem like the ID token contains fewer claims than it actually does. To see the complete payload, initialize the adapter with debugLogs: true, disable decodedIdTokenSchema, and check your browser console output.
If you absolutely need to introspect the access token, such as when migrating from another library and you cannot modify the IDP's configuration, you can decode it manually using:
oidc.ts
npm install oidc-spa zodyarn add oidc-spa zodpnpm add oidc-spa zodbun add oidc-spa zodNote: Zod is optional but highly recommended (it's not used in the simple example, only in the advanced one) . Writing validators manually is error-prone, and skipping validation means losing early guarantees about what your auth server provides. You can use another validator though, it doesn't have to be Zod.
To protect tokens against supply-chain attacks and XSS, oidc-spa must run some initialization code before any other JavaScript in your app.
This design provides much stronger security guarantees than any other adapter, and it also delivers unmatched login performance. More details .
First rename your entry point file from main.ts to main.lazy.ts
Then create a new main.ts file:
Live here:
This setup show you how you can:
Mock implementation of the adapter.
Fetching the initialization parameter remotly.
Protecting groupes based on roles.
Validating the shape of the access token.
Now that authentication is handled, there’s one last piece of the puzzle: your resource server, the backend your app will communicate with.
This can be any type of service: a REST API, tRPC server, or WebSocket endpoint, as long as it can validate access tokens issued by your IdP.
If you’re building it in JavaScript or TypeScript (for example, using Express), oidc-spa provides ready-to-use utilities to decode and validate access tokens on the server side.
You’ll find the full documentation here:
Still under construction, please wait a little before using.
In Vite apps, this is done through a Vite Plugin (If you'd rather avoid using the Vite plugin checkout the Other SPAs tab).
import { defineConfig } from "vite";
import { oidcSpa } from "oidc-spa/vite-plugin";

export default defineConfig({
    plugins: [
        // ...
First rename your entry point file from main.tsx (or main.ts or whatever it is) to main.lazy.tsx
mv src/main.ts src/main.lazy.tsThen create a new index.tsx file:
If you don't have a precise entrypoint that you can simply override, just call oidcEarlyInit as soon as possible and try canceling as much work as possible when shouldLoadApp is false.
Then:
Yes really it's that simple.
In this page we will see how to relax your Content-Security-Policy just enough so session restoration using iframe is possible.
Silent session restoration via iframe is optional, oidc-spa can restore user session just fine using full page redirect.
If that is so, why does oidc-spa even attemt to use iframe?
In some cases, you might want to perform some actions when the user login to your app.
It might be clearing some storage values, or calling a specific API endpoint. If this action is costly. You might want to avoid doing it over and over again each time the user refresh the page.
You can also do this in your React component (although it's maybe not the best approach)
oidc-spa internally relies on the browser API for cryptographic operations.
This API is only available when your app is served over HTTPS or from localhost.
However, in certain intranet environments, for example, when using a local DNS entry or static IP, setting up HTTPS might not be feasible.
In those cases, you can work around the issue by installing a polyfill such as .
npx gitpick keycloakify/oidc-spa/tree/main/examples/react-router-declarative rr-declarative-oidc
cd rr-declarative-oidc
# You can use our preconfigured Keycloak, Auth0, or Google OAuth test accounts
cp .env.local.sample .env.local
npm install
npm run dev

# Start exploring with: src/oidc.tsnpx gitpick keycloakify/oidc-spa/tree/main/examples/react-router-data rr-data-oidc
cd rr-data-oidc
# You can use our preconfigured Keycloak, Auth0, or Google OAuth test accounts
cp .env.local.sample .env.local
npm install
npm run dev
# Start exploring with: src/oidc.ts {
dependencies: {
- "keycloak-js": "...",
+ "oidc-spa": "..."
}
}import { decodeJwt } from 'oidc-spa/tools/decodeJwt';
const decodedAccessToken = decodeJwt(await oidc.getAccessToken());import { oidcSpa } from "oidc-spa/react-spa";
import { decodeJwt } from "oidc-spa/tools/decodeJwt";
export const {
bootstrapOidc,
getOidc,
// ...
} = oidcSpa
.withExpectedDecodedIdTokenShape({ /* ... */ })
.createUtils();
let decodedAccessToken: Record<string, unknown> | undefined;
getOidc().then(async oidc => {
if (!oidc.isUserLoggedIn) {
return;
}
const accessToken = await oidc.getAccessToken();
decodedAccessToken = decodeJwt(accessToken);
// Using Zod to validate the shape is recommended as well:
// decodedAccessToken = DecodedAccessTokenSchema.parse(decodeJwt(accessToken));
});
export function getDecodedAccessToken(): Record<string, unknown> | undefined {
if (decodedAccessToken === undefined) {
throw new Error("Decoded access token accessed too early. Only use in a component inside <OidcInitializationGate />.");
}
return decodedAccessToken;
}import { oidcEarlyInit } from "oidc-spa/entrypoint";
const { shouldLoadApp } = oidcEarlyInit({
freezeFetch: true,
freezeXMLHttpRequest: true,
freezeWebSocket: true,
BASE_URL: "/" // The path where your app is hosted, can also be provided later to createOidc()
});
if (shouldLoadApp) {
// Note: Deferring the main app import adds a few milliseconds to cold start,
// but dramatically speeds up auth. Overall, it's a net win.
import("./index.lazy");
}import { createOidc } from "oidc-spa";
const oidc = await createOidc({ /* ... */ });
if (oidc.isUserLoggedIn) {
if( oidc.isNewBrowerSession ){
// This is a new visit of the user on your app
// or the user signed out and signed in again with
// an other identity.
await api.onboard(); // (Example)
}else{
// It was just a page refresh (Ctrl+R)
}
}import { createReactOidc } from "oidc-spa/react";
export const {
/* ... */
getOidc
} = createReactOidc({ /* ... */ });
getOidc().then(oidc => {
if( oidc.isNewBrowerSession ){
// This is a new visit of the user on your app
// or the user signed out and signed in again with
// an other identity.
await api.onboard(); // (Example)
}else{
// It was just a page refresh (Ctrl+R)
}
});For security if and only if your app talks to more than one resource server (which is not the case in most apps), because "multiple oidc-client" + "no iframe SSO" = "oidc-spa needs to persist tokens in session storage".
This happens when:
X-Frame-Options: DENY
Content-Security-Policy: frame-src 'none'
Content-Security-Policy: frame-src 'self'
Content-Security-Policy: frame-src 'self' https://not-my-idp.com
If the IdP domain is missing from frame-src, the iframe cannot load → silent SSO cannot run.
Silent SSO needs to temporarily load your app inside an iframe (when the IdP redirects back with the authorization response).
If you block this:
Content-Security-Policy: frame-ancestors 'none'
…then the IdP cannot redirect to your app inside the iframe → silent SSO fails.
To restore silent SSO:
Remove any X-Frame-Options header (deprecated).
Allow the IdP domain in frame-src.
Allow your app to frame itself using frame-ancestors 'self'.
Example:
Tip: Instead of hardcoding the IdP domain, allow sibling subdomains of your app’s domain. This stays aligned with same-site cookie rules and avoids config drift between environments.
The Nginx configuration below demonstrates this pattern.
This is a portable, production-grade Ngnix config for an SPA with "as strict as can be" CSPs that still enable oidc-spa to use iframe for performing session restoration.
Of course you can relax thoses CSP to meet the specific need of your app. This is just an example of what you would use if you use no service/web workers and don't have any inline script.
Edit your public.html (or the file that defines your HTML head, e.g. in TanStack Start or React Router framework mode) and add the following scripts:
✅ Summary:
If you see the error Crypto.subtle is available only in secure contexts (HTTPS) in a non-HTTPS environment, install webcrypto-liner. This allows oidc-spa to work even on local or intranet setups without HTTPS.
npm install --save webcrypto-liner- import Keycloak from "keycloak-js";
+ import { Keycloak } from "oidc-spa/keycloak-js";import { useOidc } from "./oidc";
import { useEffect } from "react";
function MyComponent(){
const { isUserLoggedIn, isNewBrowserSession, backFromAuthServer } = useOidc();
useEffect(()=> {
if( oidc.isNewBrowerSession ){
// This is a new visit of the user on your app
// or the user signed out and signed in again with
// an other identity.
api.onboard(); // (Example)
}else{
// It was just a page refresh (Ctrl+R)
}
}, []);Content-Security-Policy:
frame-src https://auth.my-domain.com;
frame-ancestors 'self';
...other CSP directives...# Assuming nginxinc/nginx-unprivileged
# ============================================================
# Dynamic base domain extraction (per request)
# Example: dashboard.my-company.com -> my-company.com
# ============================================================
map $host $base_domain {
~^(?<sub>.+)\.(?<domain>[^.]+\.[^.]+)$ $domain;
default $host;
}
server {
listen 8080;
# -------------------------
# Gzip
# -------------------------
gzip on;
gzip_vary on;
gzip_min_length 1024;
gzip_proxied expired no-cache no-store private auth;
gzip_types
text/plain text/css text/xml text/javascript
application/javascript application/x-javascript application/xml;
gzip_disable "MSIE [1-6]\.";
# -------------------------
# Root and SPA routing
# -------------------------
root /usr/share/nginx/html;
index index.html;
location / {
try_files $uri $uri/ /index.html;
}
# -------------------------
# Vite hashed assets (cache 1 year)
# -------------------------
location ^~ /assets/ {
try_files $uri =404;
expires 1y;
access_log off;
add_header Cache-Control "public" always;
}
# -------------------------
# HTML (never cached) + CSP
# -------------------------
location ~* \.html$ {
try_files $uri =404;
expires -1;
add_header Content-Security-Policy "
frame-src https://*.$base_domain;
frame-ancestors 'self';
object-src 'none';
worker-src 'none';
script-src 'self' 'strict-dynamic';
" always;
}
# -------------------------
# JSON / TXT (never cached)
# -------------------------
location ~* \.(json|txt)$ {
try_files $uri =404;
expires -1;
}
# -------------------------
# Any other file with an extension (cache 1 day)
# -------------------------
location ~ ^.+\..+$ {
try_files $uri =404;
expires 1d;
access_log off;
add_header Cache-Control "public" always;
}
}<head>
<script src="https://cdnjs.cloudflare.com/ajax/libs/babel-polyfill/7.7.0/polyfill.min.js"></script>
<script src="https://cdnjs.cloudflare.com/ajax/libs/asmCrypto/2.3.2/asmcrypto.all.es5.min.js"></script>
<script src="https://cdn.rawgit.com/indutny/elliptic/master/dist/elliptic.min.js"></script>
</head>import "webcrypto-liner/build/webcrypto-liner.shim";
// ...Set the Authorized Redirect URIs:
https://my-app.com/ and http://localhost:5173/ (Ensure the trailing slash is included).
If your app is hosted under a subpath (e.g., /dashboard), set:
https://my-app.com/dashboard/
http://localhost:5173/dashboard/
5173 is Vite's default development server port—adjust as needed.
Set the Authorized JavaScript Origins to match the origins of your redirect URIs.
Well there is a way to go around this, and that is to ask oidc-spa to substitute the Acess Token by the ID token.
Be aware that this is a hack, the ID token is not meant to be sent to the API but it works.
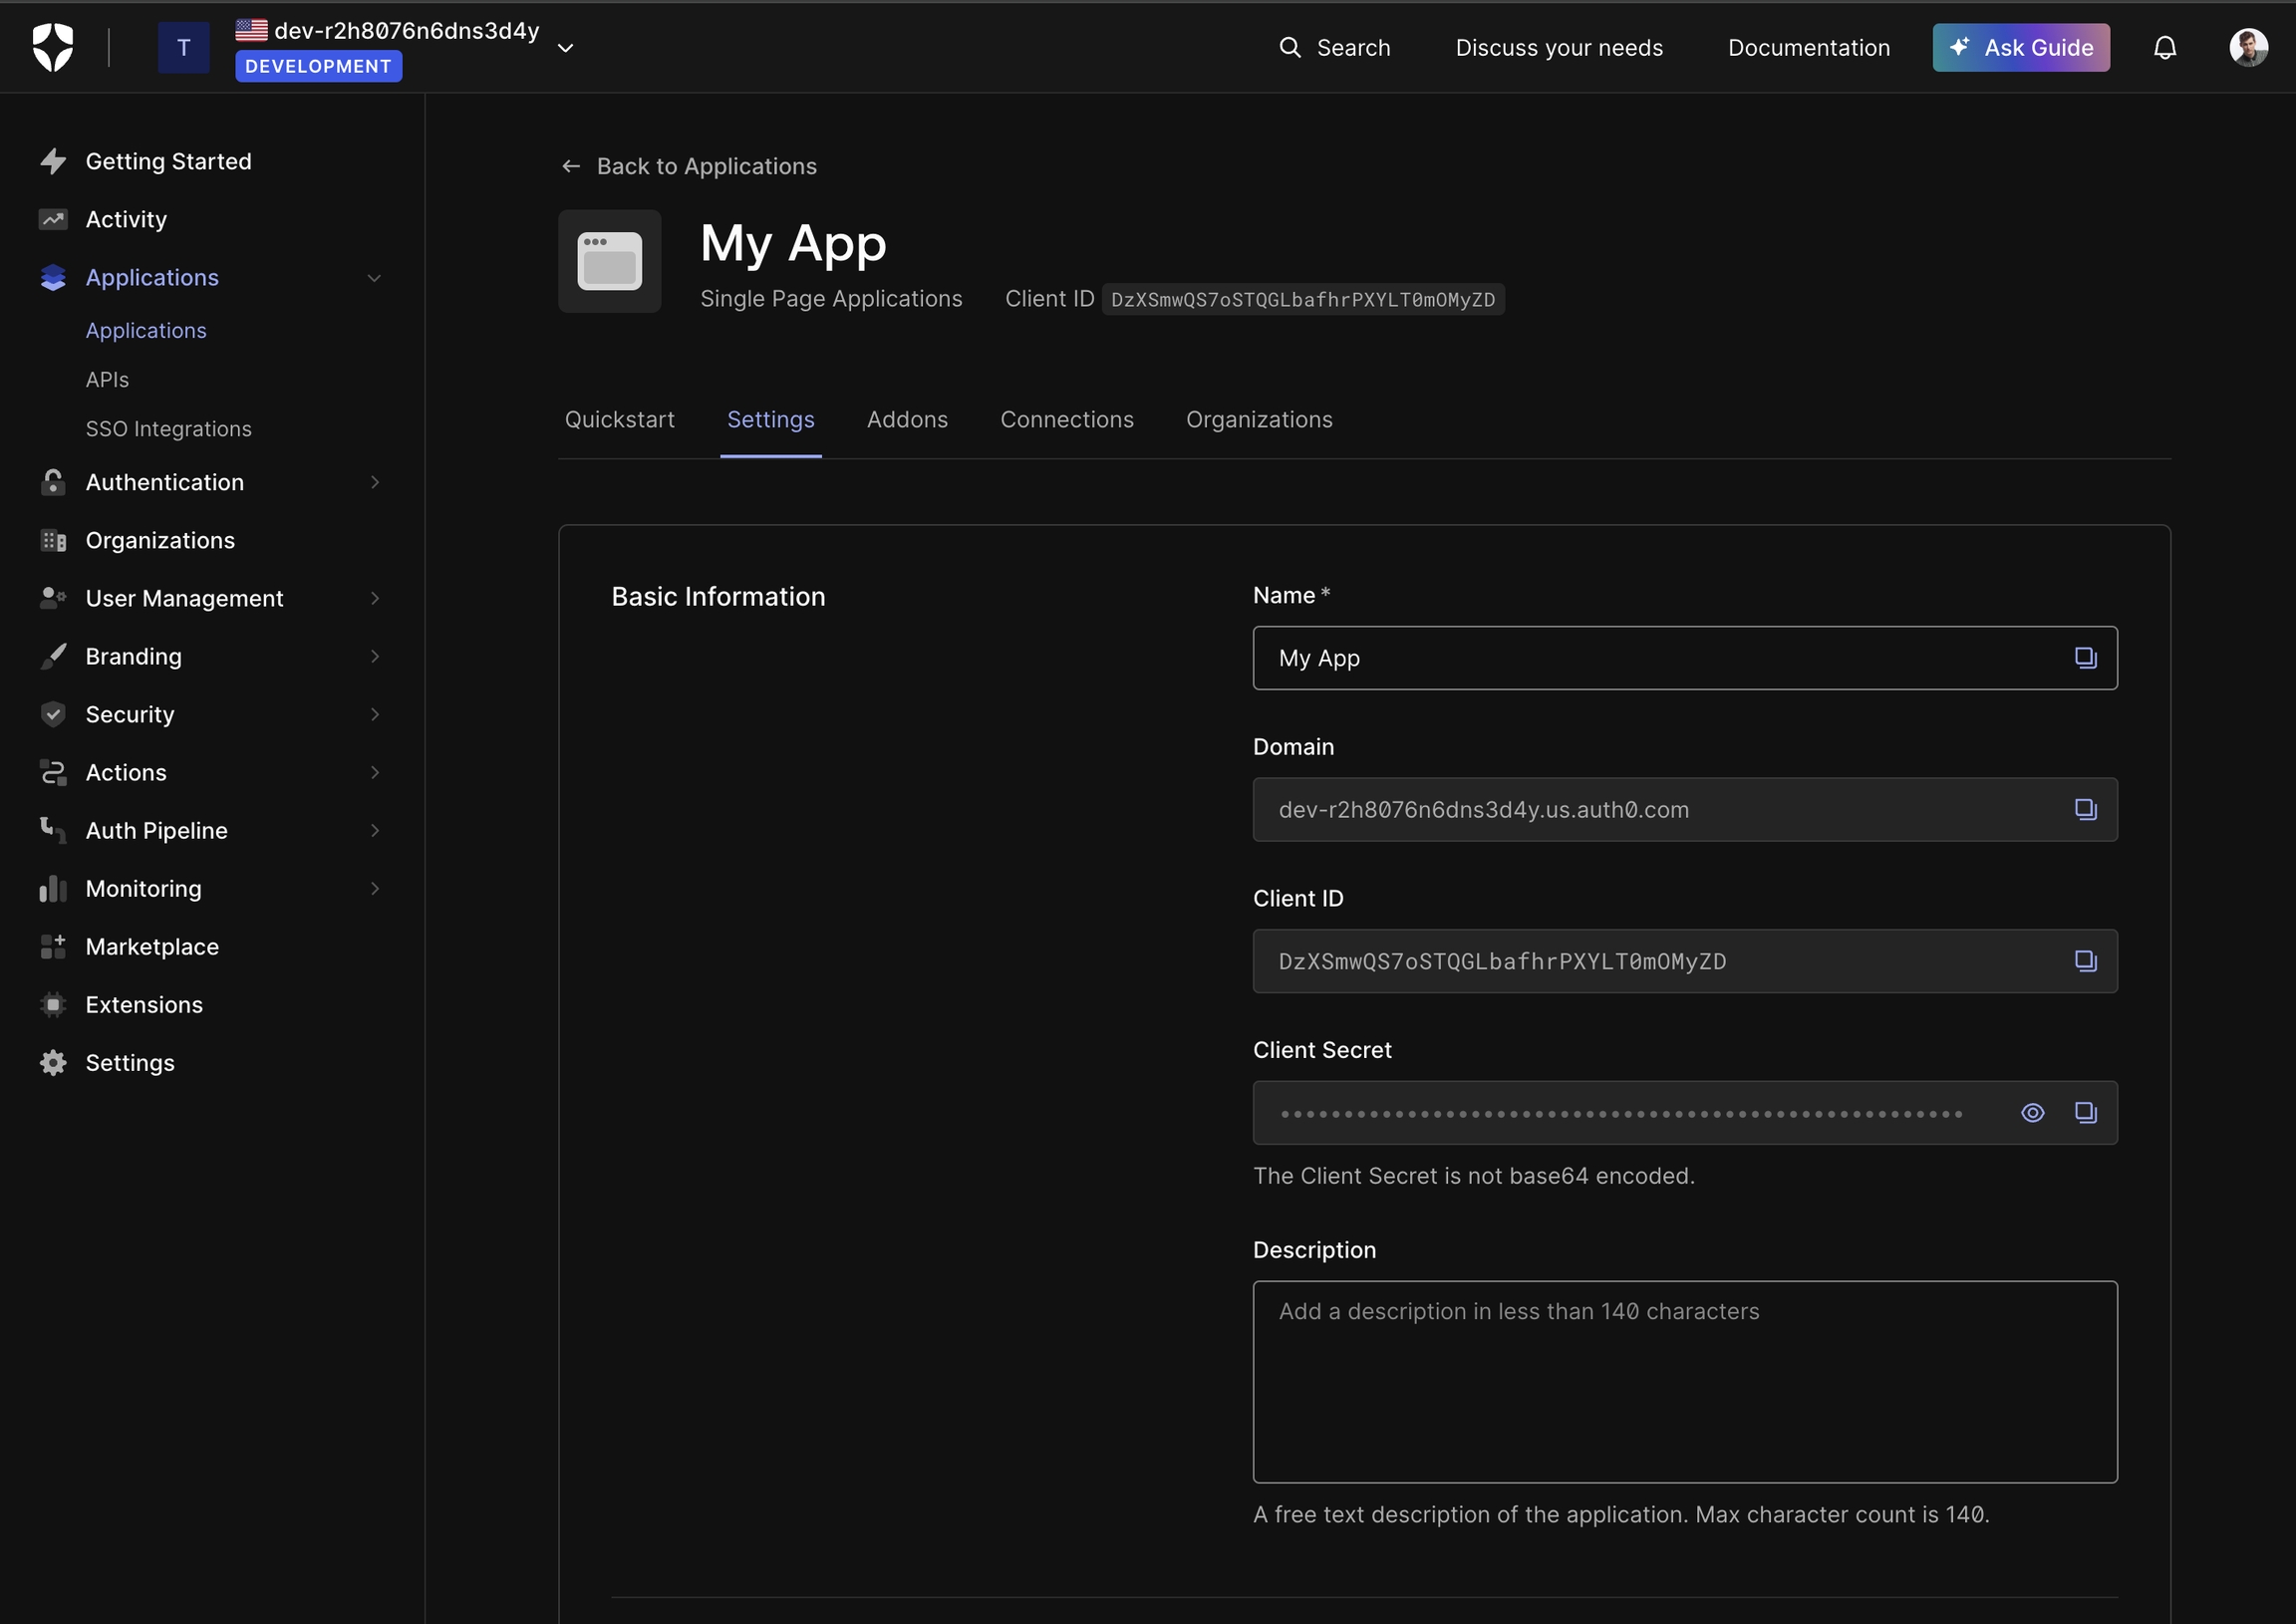
This guide explains how to configure Auth0 to obtain the necessary parameters for setting up oidc-spa.
Navigate to Auth0 Dashboard.
In the left panel, go to Applications → Applications.
Click Create Application.
Select Single Page Application as the application type.
Navigate to the Settings tab to find the Domain and Client ID.
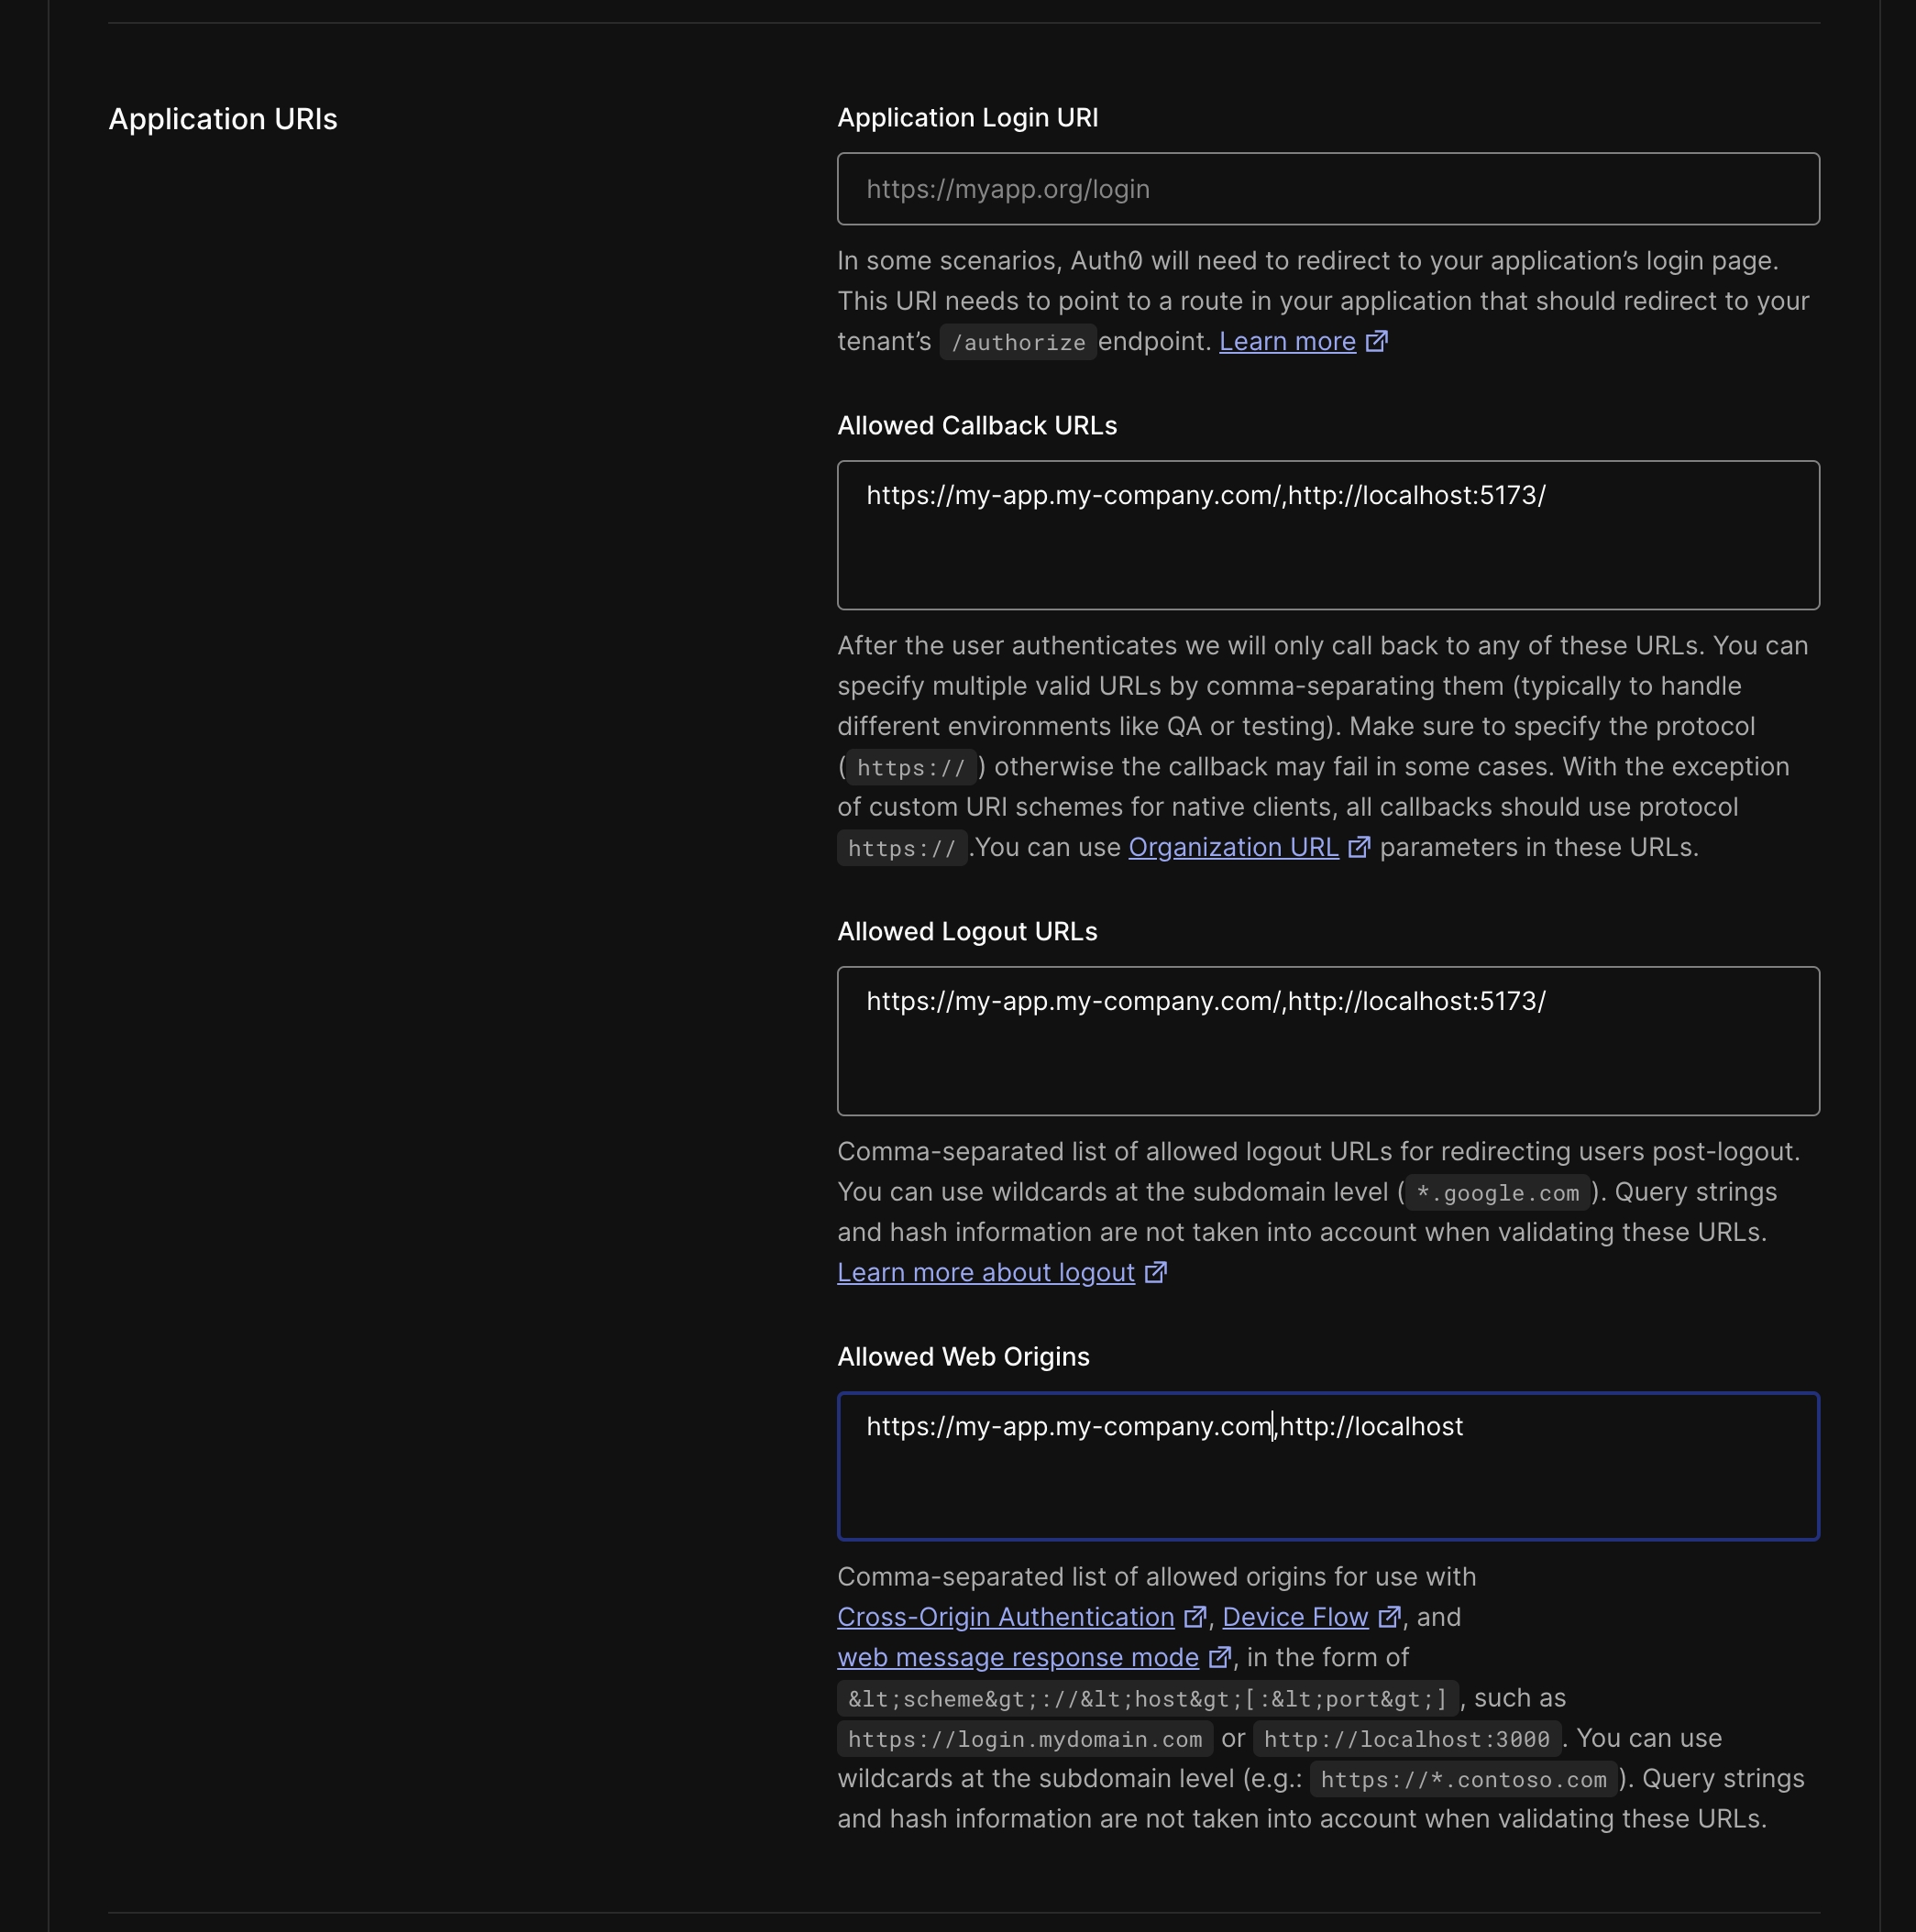
Scroll to the Application URIs section. Set two Allowed Callback URLs, ensure both URLs end with /:
https://<APP_DOMAIN><BASE_URL>
http://localhost:<DEV_PORT><BASE_URL>
Allowed Logout URLs: Copy paste what you put into Allowed Callback URLs
Allowed Web Origins: The origins of the Callback URLs
Click Save Changes
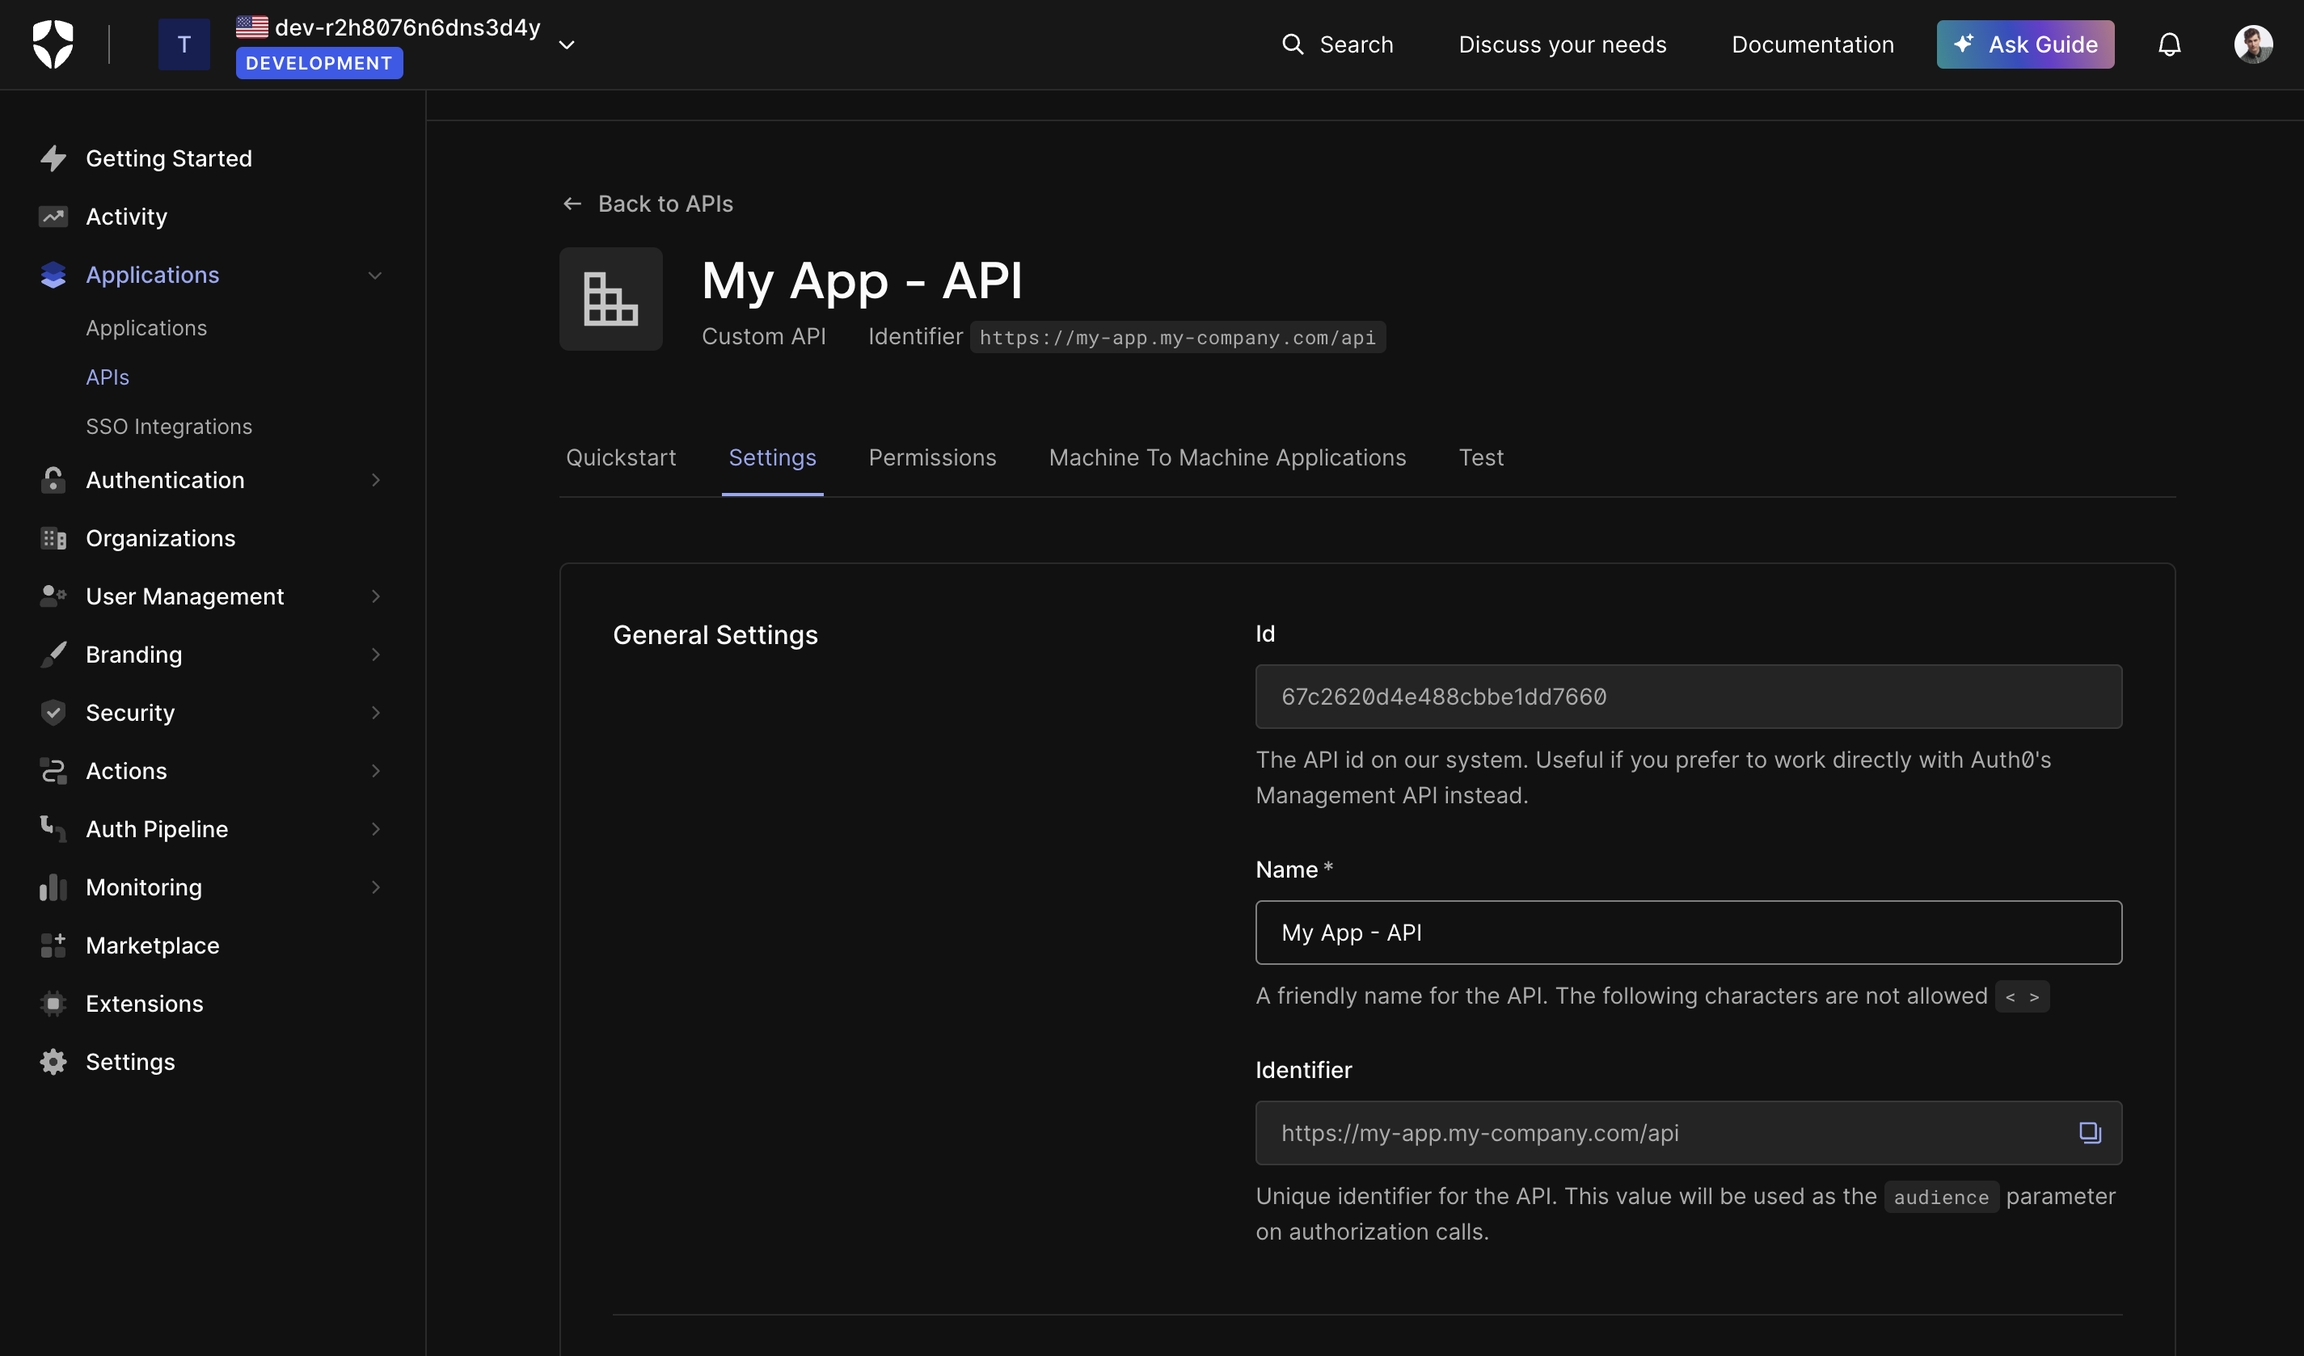
If you need Auth0 to issue a JWT access token for your API, follow these steps:
Navigate to .
In the left panel, go to Applications → APIs.
Click Create API.
Configure the API:
It is highly recommended to set up a custom domain in Auth0 to ensure Auth0 is not treated as a third-party service by browsers.
By default, Auth0 does not issue a refresh token. If your access token expires and you haven't configured a custom domain, oidc-spa will force reload your app to refresh the token, instead of doing it silently in the background.
Auth0 access tokens have a default validity of 24 hours, so if you don’t modify this setting, you won’t notice page reloads. However, if your app requires shorter expiration times for security reasons, a custom domain is necessary.
Navigate to the .
Click Settings in the left panel.
Open the Custom Domain tab.
Configure a custom domain (e.g., auth.my-company.com).
Once configured, use your custom domain as the issuerUri:
If you want users to be automatically logged out after a period of inactivity, follow these steps.
For security-critical applications like banking or admin dasboards users should:
Log in on every visit.
Be logged out after inactivity.
This prevents unauthorized access if a user steps away from their device.
For apps like social media or e-comerce shop on the other hand it's best not to enable auto logout.
Navigate to .
Click Settings in the left panel.
Open the Advanced tab.
Configure Session Expiration:
Since Auth0 does not issue refresh tokens (or issues non-JWT ones), inform oidc-spa of your settings:
You can enhance user experience by displaying a countdown warning before logout:
To test your configuration:
Nearly all OpenID Connect adapters, including keycloak-js, implement token renewal incorrectly.
With oidc-spa, you never have to worry about this. Token lifecycle management is fully abstracted away, as it should be.
The Problem With Access Token Refresh Loops
Access tokens are meant to be short-lived (typically ~5 minutes, but sometimes as little as 20 seconds for high-security apps). Many adapters try to keep an access token “always fresh” in cache, which leads to:
Constant background refreshes
How oidc-spa mitigates the risks of token exposure
The API of enableTokenExfiltrationDefense is not stable yet. We're still actively working on those defences. They will evolves in the comming weeks.
oidc-spa implements a comprehensive, defense-in-depth strategy to protect against token exfiltration during a successful XSS or supply-chain attack.
The objective is to achieve, in a purely client-side architecture, a level of token safety comparable to traditional backend-based authentication (session cookies). The concerns raised in the talk below no longer apply when the exfiltration defence is enabled. And even without the advanced defence enabled, the demo where they manually request a token would be structurally impossible with oidc-spa, an attacker cannot request new cretentials.
With the defence enabled, an attacker cannot read or request valid tokens. This is the same property provided by backend session cookies.
Here is how you can gracefully handle oidc initialization errors:
Formerly Azure Active Directory
import { createOidc } from "oidc-spa";

export const prOidc = createOidc({
    issuerUri: "https://accounts.google.com",
    clientId: "928024164279-ifjvmsffi64slkk81h3gmoh7p03ev68k.apps.googleusercontent.com",
    homeUrl: import.meta.env.BASE_URL,
    scope: ["profile", "email",
    /*Obtionally more scopes to get more infos in the id token like "https://www.googleapis.com/auth/youtube.readonly", ...*/
    ],
    __unsafe_clientSecret: "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",
    __unsafe_useIdTokenAsAccessToken: true
});import { createReactOidc } from "oidc-spa/react";
export const { OidcProvider, useOidc, getOidc } = createReactOidc({
issuerUri: "https://accounts.google.com",
clientId: "928024164279-ifjvmsffi64slkk81h3gmoh7p03ev68k.apps.googleusercontent.com",
homeUrl: import.meta.env.BASE_URL,
scope: ["profile", "email",
/*Obtionally more scopes to get more info in the id token like "https://www.googleapis.com/auth/youtube.readonly", ...*/
],
__unsafe_clientSecret: "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",
__unsafe_useIdTokenAsAccessToken: true
});npx degit https://github.com/keycloakify/oidc-spa/examples/tanstack-router-file-based oidc-spa-tanstack-router
cd oidc-spa-tanstack-router
cp .env.local.sample .env.local
# Edit .env.local, uncomment the Google section and comment the Keycloak section
# replace the values by your own.
yarn
yarn devmv src/main.tsx src/main.lazy.tsximport { oidcEarlyInit } from "oidc-spa/entrypoint";
const { shouldLoadApp } = oidcEarlyInit();
if (shouldLoadApp) {
// Note: Deferring the main app import adds a few milliseconds to cold start,
// but dramatically speeds up auth. Overall, it's a net win.
import("./main.lazy");
}npx gitpick keycloakify/oidc-spa/tree/main/examples/angular oidc-spa-angular
cd oidc-spa-angular
npm install
npm run startnpx gitpick keycloakify/oidc-spa/tree/main/examples/angular-kitchensink oidc-spa-angular-kitchensink
cd oidc-spa-angular-kitchensink
npm install
npm run startimport type { Config } from "@react-router/dev/config";
export default {
ssr: false
} satisfies Config;npx gitpick keycloakify/oidc-spa/tree/main/examples/react-router-framework rr-framework-oidc
cd rr-framework-oidc
# You can use our preconfigured Keycloak, Auth0, or Google OAuth test accounts
cp .env.local.sample .env.local
npm install
npm run dev
# Start exploring with: src/oidc.ts
import { createOidc, type OidcInitializationError } from "oidc-spa/core";

const oidc = await createOidc({
    // ...
    autoLogin: true
})
// In autoLogin: false, createOidc never throws.
// In autoLogin: true, it can throw — but only OidcInitializationError —
// so you can safely narrow/cast here.
.catch(error => error as OidcInitializationError);

if( oidc instanceof Error ){

    const oidcInitializationError = oidc;

    // Use this to distinguish a misconfiguration from a temporary auth-server outage.
    // NOTE: below references should use `oidcInitializationError`.
    console.log(initializationError.isAuthServerLikelyDown);

    // Developer-only diagnostic with likely cause and fix.
    // Do not display this to end users.
    console.log(initializationError.message);

    alert("Our auth is down, sorry :(");

    // Halt the app in a typed-safe way (nothing renders until you decide otherwise).
    await Promise<never>(()=>{});
}
Heavy load on your auth server
Wasteful duplication when multiple tabs are open
This is unnecessary. You don’t need a valid access token cached at all times.
The Correct Approach (What oidc-spa Does)
Whenever you need to make an authenticated request, just ask oidc-spa for a token:
If a valid token is cached, you’ll get it.
If it’s expired, oidc-spa silently refreshes it using the refresh token.
So the correct approaches when you need an access token are:
via an interceptor that injects it into requests, or
with a wrapper around fetch() that awaits oidc.getAccessToken().
Example: interceptor pattern Example: custom fetch
Behind the scenes, oidc-spa ensures the session never expires prematurely by refreshing at least once before the refresh token itself expires.
This prevents the backend from destroying the session simply because the user wasn’t making authenticated requests (e.g., they’re filling out a form or browsing content).
At the same time, oidc-spa tracks actual user activity (keyboard, mouse, touch). If the user is truly idle beyond the refresh token lifespan, they’re logged out as expected.
This is the only correct model. There aren’t “multiple valid strategies.” It shouldn’t be configurable, because there is nothing to configure.
Why Other Adapters Get It Wrong
Adapters like keycloak-js expose the access token synchronously (keycloak.token).
To keep that contract, they’re forced to brute-force the server with background refreshes, otherwise, you might read an expired token.
That’s why they give you knobs to “configure auto-renewal.” In reality, this pushes responsibility onto you for something the adapter should handle internally.
On top of that the fresh loop does not even guarenty you'll never read an expired token, for example, when the computer wakes up from sleep to an expired token, the token can be expired and the adapter would have had no time to refresh it. The Keycloak team is well aware of the design flaw of keycloak-js and keep it as is because changing the API would cause too much distruption. However, when they use keycloak-js internally for their app, like the Admin Console. They apply the same strategy as oidc-spa.
Why oidc-spa Still Exposes renewTokens()
There are two legitimate edge cases:
After custom requests: If you make a request to your OIDC server that changes claims in the id_token or access_token, call renewTokens() to ensure you have the latest values. (This is a very rare usecase, usually the user info are updated outside of your app, if you're not sure, you can safely assume your not doing any of those request).
Custom token parameters: If your OIDC server supports extra token endpoint params, you can trigger a refresh with them. (extraTokenParams is also available at createOidc() time.)
Outside of these rare cases, you never need to call renewTokens() manually.
👉 With oidc-spa, token renewal is always correct, efficient, and invisible to you.
Outside of a React Component:
Inside of a React Component (not valid for real world usecase, just for diagnostic)
import { HeadContent, Scripts, createRootRoute } from "@tanstack/react-router";

import Header from "@/components/Header";
import { AutoLogoutWarningOverlay } from "@/components/AutoLogoutWarningOverlay";
import { useOidc } from "@/oidc";
import type { OidcInitializationError } from "oidc-spa/core";

export const Route = createRootRoute({
    // ...
    shellComponent: RootDocument
});

function RootDocument({ children }: { children: React.ReactNode }) {

    const { oidcInitializationError } = useOidc();

    return (
        <html lang="en">
            <head>
                <HeadContent />
            </head>
            <body>
                <div className="min-h-screen flex flex-col">
                    <Header />
                    <main className="flex flex-1 flex-col">
                        {oidcInitializationError ? (
                            <OidcErrorComponent oidcInitializationError={oidcInitializationError} />
                        ) : (
                            children
                        )}
                    </main>
                </div>
                <AutoLogoutWarningOverlay />
                <Scripts />
            </body>
        </html>
    );
}

function OidcErrorComponent(props: {
    oidcInitializationError: OidcInitializationError;
}){
    const { oidcInitializationError } = props;

    // Distinguish misconfiguration vs. temporary auth-server outage.
    console.log(oidcInitializationError.isAuthServerLikelyDown);

    // Developer-only diagnostic with likely cause and fix.
    // Do not display this to end users.
    console.log(oidcInitializationError.message);

    return <h1>Our auth is down, sorry</h1>;

}
import { oidcSpa } from "oidc-spa/react-spa";

export const {
    bootstrapOidc,
    useOidc,
    getOidc,
    OidcInitializationGate,
    OidcInitializationErrorGate
} = oidcSpa
    .withExpectedDecodedIdTokenShape({ /* ... */ }),
    .withAutoLogin()
.createUtils();import React from "react";
import ReactDOM from "react-dom/client";
import { App } from "./App";
import {
OidcInitializationGate,
OidcInitializationErrorGate
} from "~/oidc";
import type { OidcInitializationError } from "oidc-spa/core";
ReactDOM.createRoot(document.getElementById("root")!).render(
<React.StrictMode>
<OidcInitializationGate>
<OidcInitializationErrorGate errorComponent={OidcErrorComponent} >
<App />
</OidcInitializationErrorGate>
</OidcInitializationGate>
</React.StrictMode>
);
function OidcErrorComponent(props: {
oidcInitializationError: OidcInitializationError;
}){
const { oidcInitializationError } = props;
// Distinguish misconfiguration vs. temporary auth-server outage.
console.log(oidcInitializationError.isAuthServerLikelyDown);
// Developer-only diagnostic with likely cause and fix.
// Do not display this to end users.
console.log(oidcInitializationError.message);
return <h1>Our auth is down, sorry</h1>;
}@if (oidc.initializationError) {
<h1>Our Auth is down, sorry :(</h1>
}@else{
<!-- Your app -->
}@Component({
selector: 'app-root',
imports: [RouterOutlet, RouterLink, RouterLinkActive],
templateUrl: './app.html',
})
export class App {
oidc = inject(Oidc);
constructor(){
if( this.oidc.initializationError ){
const { initializationError } = this.oidc;
// Distinguish a misconfiguration from a temporary auth-server outage.
console.log(initializationError.isAuthServerLikelyDown);
// Developer-only diagnostic with likely cause and fix.
// Do not display this to end users.
console.log(initializationError.message);
}
}
}import { createOidc } from "oidc-spa";
const prOidc = await createOidc({ ... });
// Function to call when we want to renew the token
export function renewTokens(){
const oidc = await prOidc;
if( !oidc.isUserLoggedIn ){
throw new Error("Logical error");
}
oidc.renewToken(
// Optionally you can pass extra params that will be added
// to the body of the POST request to the openid-connect/token endpoint.
// { extraTokenParams: { electedCustomer: "customer123" } }
// This parameter can also be provided as parameter to the createOidc
// function. See: https://github.com/keycloakify/oidc-spa/blob/59b8db7db0b47c84e8f383a86677e88e884887cb/src/oidc.ts#L153-L163
);
}
// Subscribing to token renewal
prOidc.then(oidc => {
if( !oidc.isUserLoggedIn ){
return;
}
const { unsubscribe } = oidc.subscribeToTokensChange(tokens => {
console.log("Token Renewed", tokens);
});
setTimeout(() => {
// Call unsubscribe when you want to stop watching tokens change
unsubscribe();
}, 10_000);
});import { getOidc } from "~/oidc";
// Function to call when we want to renew the token
export function renewTokens(){
const oidc = await getOidc({ assert: "user logged in" });
oidc.renewToken(
// Optionally you can pass extra params that will be added
// to the body of the POST request to the openid-connect/token endpoint.
// { extraTokenParams: { electedCustomer: "customer123" } }
// This parameter can also be provided as parameter to the createOidc
// function. See: https://github.com/keycloakify/oidc-spa/blob/59b8db7db0b47c84e8f383a86677e88e884887cb/src/oidc.ts#L153-L163
);
}
// Subscribing to token renewal
getOidc().then(oidc => {
if( !oidc.isUserLoggedIn ){
return;
}
const { unsubscribe } = oidc.subscribeToTokensChange(tokens => {
console.log("Token Renewed", tokens);
});
setTimeout(() => {
// Call unsubscribe when you want to stop watching tokens change
unsubscribe();
}, 10_000);
});import { useState, useEffect } from "react";
import { assert } from "tsafe/assert";
import { useOidc, getOidc } from "../oidc";
export function LogTokens() {
const { decodedIdToken, renewTokens } = useOidc({ assert: "user logged in" });
const { decodedAccessToken } = useDecodedAccessToken();
return (
<>
<h3>Decoded ID Token:</h3>
<pre>{JSON.stringify(decodedIdToken, null, 2)}</pre>
<br />
<button onClick={() => renewTokens()}>Refresh Tokens</button>
</>
);
}const oidc = await getOidc();
if (!oidc.isUserLoggedIn) {
throw Error("Logical error in our application flow");
}
const { accessToken } = await oidc.getTokens();
headers.set("Authorization", `Bearer ${accessToken}`);Parameters:
<APP_DOMAIN>: Examples: https://my-company.com or https://app.my-company.com. 🔹 For beter performances ensure <APP_DOMAIN> and <KC_DOMAIN> share the same root domain (my-company.com). See end of third party cookies.
<BASE_URL>: Examples: "/" or "/dashboard/".
<DEV_PORT>: Example: 5173 (default for Vite's dev server, adapt to your setup).
Identifier: Ideally, use your API's root URL (e.g., https://myapp.my-company.com/api). However, this is just an identifier, so any unique string works. It will be the aud claim of the access tokens issued. See the web API page for more info.
Click Save.
See the end of third-party cookie page for more details.
Idle Session Lifetime: 5 minutes (300 seconds) – logs out inactive users.
Maximum Session Lifetime: 14 days (20160 minutes) – ensures active users stay logged in.
Configure Access Token Lifetime:
Go to Applications → APIs.
Select your API (My App - API or the name used earlier).
Open the Settings tab.
Under Access Token Settings:
Maximum Access Token Lifetime: 4 minutes (240 seconds) – should be shorter than the Idle Session Lifetime.
Implicit/Hybrid Flow Access Token Lifetime: 4 minutes – required to save settings, even if unused.
Click Save.
It’s possible that your app will refuse to start after enabling the defence.
If this happens, a dependency in your app is attempting to monkey-patch critical built-ins. oidc-spa cannot allow this while guaranteeing token protection.
Examples of incompatible libraries:
@microsoft/applicationinsights, monkey-patches fetch
Zone.js, monkey-patches Promise and XMLHttpRequest
If you encounter this situation, your only options are:
Remove or replace the incompatible libraries, or
Disable the oidc-spa exfiltration defence
Even with this defence disabled, oidc-spa still implements all current best practices for secure client-side auth (including zero token persistence). Your app will still pass a security audit.
Enabling the defence is simply a matter of flipping a switch:
⸻
If an NPM dependency is compromised, the damage remains extremely limited:
The attacker cannot exfiltrate valid tokens
This blocks the most common and impactful class of supply-chain attacks • Most real-world supply-chain malware is opportunistic, not targeted
An attacker could theoretically act on behalf of the user during the active compromise, but:
This requires a targeted attack specifically against your build
This is realistic only for massive, high-value open-source systems
Even then, oidc-spa makes it very difficult
Why? Because unlike session-cookie auth, where any fetch() automatically includes credentials, here the attacker must obtain a reference to your fetchWithAuth() or getOidc() functions.
These functions usually live inside hashed static assets (example: assets/KcAdminUi-BV3D797K.js). The hash will likely differ between the moment the attacker crafts the exploit and the moment the compromised dependency lands in your build.
Additionally, oidc-spa blocks the discovery of the module graph[^1].
Bottom line: For supply-chain attacks, oidc-spa offers stronger protection than traditional session cookies.
⸻
XSS remains dangerous. oidc-spa protects agaist token exfiltration, but an attacker who would know everything about your build can still manage to act on behafe of user while the attack is going on.
They can import your fetchWithAuth() implementation (exposed somwere ine the hashed js assets) and perform any action the current user is allowed to perform
The good news is that XSS can be very effectively blocked with strict Content-Security-Policy (CSP). And you should absolutely enable one.
⸻
This is the one scenario where cookie-based auth has an advantage over oidc-spa's client side auth.
If a user installs a malicious browser extension, it can inspect outgoing network traffic and see the substituted tokens.
This affects only the user with the compromised extension, and it affects all SPAs using client-side auth, not just your app.
⸻
The entire strategy relies on the fact that, thanks to the Vite plugin or oidcSpaEarlyInit, oidc-spa gets a guaranteed window of execution before any other JavaScript runs.
During that window, it can:
Harden the environment by preventing monkey-patching of fetch, XHR, WebSocket, Promise, String, and other critical built-ins
Safely extract the authorization response from the URL and store it in memory
Register a message listener that cannot be unregistered, ensuring silent-signin integrity • Enforce restrictions on service worker registration
And most importantly:
Tokens are never exposed to the application layer
The tokens your app sees are structurally valid JWTs, but the signature segment is replaced. Such tokens cannot be used to authenticate requests.
Before any request leaves the app (fetch, XHR, WebSocket, beacon), the real tokens are restored inside a hardened, sandboxed pre-network interceptor created during early init.
The only way to see the real token is to inspect network traffic.
These protections have zero impact on DX or performance. The only requirement is to avoid libraries that monkey-patch critical built-ins and know ahead of time which resources server outside of your site your app might want to send authed request to (like s3.amazon.com for example).
Go to Microsoft Azure Portal.
In the left panel, select "Microsoft Entra ID".
Navigate to "Manage > App Registrations".
Click "New Registration".
Enter "My App - API" as the name, then click Register.
Set Supported Account Type to Accounts in this organization.
In the left menu, go to "Manage > Expose API".
Click "Add a scope".
Configure as follows, then click "Add Scope":
Application ID URI: api://my-app-api (then save and continue)
Scope name: access_as_user
To validate the token on the backend, ensure that the aud claim in the JWT access token matches api://my-app-api. For more details, refer to the Web API documentation.
Go to Microsoft Azure Portal.
In the left panel, select "Microsoft Entra ID".
Navigate to "Manage > App Registrations".
Click "New Registration".
Enter "My App" as the display name (replace with your actual app name).
Set Supported Account Type to Accounts in this organization.
Click Register.
Click "Add a Redirect URI".
Click "Add Platform" > "Single-Page Application".
Set Redirect URIs:
Production: https://my-app.com/ (include trailing slash; adjust if hosted under a subpath, e.g., https://my-app.com/dashboard/)
Local Development: http://localhost:5173/ (include trailing slash; adjust based on your dev server)
Ensure "Access Token" and "ID Token" are checked.
Click Save.
In the left panel, go to "API Permissions".
Click "Add a permission".
Click "APIs My Organization Uses".
Select "My App - API".
Check "access_as_user", then click "Add permission".
In the left panel, click "Overview" and copy:
Application (client) ID
Directory (tenant) ID
These are required to configure oidc-spa.
To test your configuration:
You’re safe by default Even in the worst‑case scenario where your authorization server’s cookies are blocked by the browser,
oidc‑spaautomatically falls back to a near‑seamless full‑page redirect. No configuration required.That said, if you want the best possible user experience, it’s worth understanding what’s going on under the hood and configuring your domains and headers accordingly.
This page explains why modern browsers often refuse to send cookies in third‑party contexts, how that impacts silent session restoration in frontend centric auth model, and how to configure your domain and security headers so that oidc‑spa can deliver a seamless UX.
TL;DR
Align your application and authorization endpoint under a common parent domain so the browser treats your IdP as first‑party to your app.
Prefer iframe‑based restoration when possible.
If your CSP completly forbids iframes and you have no way to tweak them or if the IdP must live on a foreign domain, use full‑page redirects.
Traditional web apps keep a session on your backend. Your browser sends the backend’s own cookies on every request, so restoring the user session is trivial.
With oidc‑spa, your frontend talks directly to the authorization server. When a user revisits your app, oidc‑spa first tries to learn whether the user still has a valid session at the IdP without prompting for credentials again. It does so by contacting the authorization endpoint silently. If the browser sends the IdP’s cookies in that context, the IdP can attest that the user is still signed in and return the data needed to rebuild local identity.
If the browser considers the IdP third‑party to your app, it often refuses to attach those cookies in an embedded context. oidc-spa has to use full‑page redirect in those configurations.
The key is to host your application and your authorization endpoint under the same registrable (parent) domain.
App: www.my-company.com, dashboard.my-company.com, or my-company.com/dashboard
Authorization endpoint: https://auth.my-company.com/realms/oidc-spa/protocol/openid-connect/auth
Parent domain: my-company.com
App: my-company.com
Authorization endpoints on unrelated domains:
https://auth.my-keycloak.com/realms/oidc-spa/protocol/openid-connect/auth (configurable; you choose where to host)
oidc‑spa restores sessionsoidc‑spa supports two session restoration strategies. You choose (or let the library auto‑choose) using sessionRestorationMethod.
The app opens an invisible iframe to the authorization endpoint with parameters that request a silent check.
If the IdP’s cookies are present, the IdP returns enough data for the app to rebuild identity without leaving the page.
Best UX. Requires that the browser can send IdP cookies in the iframe and that your app’s security headers allow same‑origin iframes.
The app performs a quick top‑level redirect to the authorization endpoint, which always carries IdP cookies.
The redirect returns immediately to your app with the information needed to rebuild identity.
Works everywhere but is a about 30% slower and the url flashes auth response info brievly.
Multiple OIDC clients in one page: to avoid a redirect loop, the app may need to persist state between reloads (for example, tokens or a minimal session hint) which weakens the “no persistence” posture.
oidc‑spa selects the best method at runtime. If your app and IdP share a parent domain and iframes are permitted, it uses "iframe". Otherwise it uses "full page redirect".
Migration note
The old
noIframeoption is deprecated. UsesessionRestorationMethod: "full page redirect"to get equivalent behavior.
In that case, the question is:
Are you in control of your server configuration, can you change the HTTP respons headers?
If you can edit your server config, then you can relax your CSP just enough to allow iframe in the context of SSO:
If your server is what it is and have no control over it, then your only option is to force oidc-spa to use full page redirect to restore users session:
When your app runs on localhost and your IdP lives on a different domain, wichis almost always the case unless you run a keycloak locally.
The browser treats the IdP as third‑party so oidc-spa will fallback to full page redirect. To run your app in devloppement like you would in prod you need to:
Set sessionRestorationMethod: "iframe" explicitely to force oidc-spa to use iframe.
Allow third party cookies in localhost:
Most managed IdPs let you put their endpoints behind your domain. This is crucial to avoid third‑party treatment.
Auth0: supports Custom Domains for the authorization and token endpoints.
Microsoft Entra External ID / Azure AD B2C: supports Custom URL domains for user flows and policies, which cover the authorization endpoint.
Clerk: supports custom and satellite domains and proxying its Frontend API so your app interacts under your domain.
A short video that shows the UX difference between iframe‑based restoration and a full‑page redirect:
(This video was recorded a while ago, performance a much better now)
Can your app and IdP share a parent domain?
Yes → Use sessionRestorationMethod: "auto" (will pick "iframe").
No → Use "full page redirect".
Enforce authentication everywhere in your app.
Auto Login is a mode in oidc-spa designed for applications where every page requires authentication.
This is common for admin dashboards or internal tools that don’t expose any public or “marketing” pages.
When Auto Login is enabled, visiting your application automatically redirects the user to the IdP’s login page whenever no active session is detected.
The goal of this mode is to simplify your app’s authentication model. In the regular mode, where you do have public pages, you need to:
Enforce login on specific routes: call login(), use enforceLogin(), or wrap pages with withLoginEnforced()
Creating a OAuth2 enabled resource server.
If you’re using TanStack Start, token validation is already integrated into the higher-level adapter! You can create your resource server, whether through Authenticated Server Functions or traditional REST endpoint, directly within your TanStack project.
With oidc-spa, your frontend is meant to communicate with OAuth-enabled backend services, such as REST APIs, tRPC servers, or WebSocket endpoints, that accept JSON Web Tokens (JWTs) as access tokens.
These tokens are sent in the Authorization header and allow the backend to validate, decode, and use the claims to perform user-specific actions.
With oidc-spa, your frontend application is the OIDC client. Your backend is only a resource server that you call by attaching an Authorization: Bearer <access_token> header. This is different from models like , where the server component constitutes the application in the OpenID Connect model.
If oidc-spa fails to initialize (because of a misconfiguration or because the authorization server is unavailable), your app will load with the user state not logged in (oidc.isUserLoggedIn === false).
The goal is to let users browse public pages even when authentication cannot start.
If, in this state, the user clicks a “Log in” button or navigates to a page that requires authentication, by default oidc-spa will fire this alert:
Authentication is currently unavailable. Please try again later.
const { ... } = createOidc({
    // Referred to as "Domain" in Auth0:
    issuerUri: "dev-r2h8076n6dns3d4y.us.auth0.com",
    clientId: "DzXSmwQS7oSTQGLbafhrPXYLT0mOMyZD",
});const { ... } = createOidc({
issuerUri: "dev-r2h8076n6dns3d4y.us.auth0.com",
clientId: "DzXSmwQS7oSTQGLbafhrPXYLT0mOMyZD",
extraQueryParams: {
audience: "https://app.my-company.com/api"
}
}); const { ... } = createOidc({
- issuerUri: "dev-r2h8076n6dns3d4y.us.auth0.com",
+ issuerUri: "auth.my-company.com",
clientId: "DzXSmwQS7oSTQGLbafhrPXYLT0mOMyZD",
extraQueryParams: {
audience: "https://app.my-company.com/api"
}
});const { ... } = createOidc({
issuerUri: "auth.my-company.com",
clientId: "DzXSmwQS7oSTQGLbafhrPXYLT0mOMyZD",
extraQueryParams: {
audience: "https://app.my-company.com/api"
},
idleSessionLifetimeInSeconds: 300
});npx degit https://github.com/keycloakify/oidc-spa/examples/tanstack-router-file-based oidc-spa-tanstack-router
cd oidc-spa-tanstack-router
cp .env.local.sample .env.local
# Uncomment the Auth0 section and comment out the Keycloak section.
# Update the values with your own.
yarn
yarn devimport { oidcSpa } from "oidc-spa/vite-plugin";
export default {
plugins: [
// ...
oidcSpa({
enableTokenExfiltrationDefense: true,
// If you send auted request to third party server
// (outside of your site) you must declare them.
//resourceServersAllowedHostnames: [ "s3.amazonaws.com" ]
})
]
};import { oidcSpaEarlyInit } from "oidc-spa/earlyInit";
oidcSpaEarlyInit({
enableTokenExfiltrationDefense: true,
// If you send auted request to third party server
// (outside of your site) you must declare them.
//resourceServersAllowedHostnames: [ "s3.amazonaws.com" ]
});import { createOidc } from "oidc-spa";
// Directory (tenant) ID:
const directoryId = "XXXXXX-XXXX-XXXX-XXXX-XXXXXXXXXXXX";
// Application (client) ID:
const clientId = "XXXXXX-XXXX-XXXX-XXXX-XXXXXXXXXXXX";
// Application ID URI: (Of the API!)
const applicationIdUri_api= "api://my-app-api/access_as_user";
export const prOidc = createOidc({
issuerUri: `https://login.microsoftonline.com/${directoryId}/v2.0`,
clientId,
scopes: ["profile", applicationIdUri_api],
homeUrl: import.meta.env.BASE_URL
});import { createReactOidc } from "oidc-spa/react";
// Directory (tenant) ID:
const directoryId = "XXXXXX-XXXX-XXXX-XXXX-XXXXXXXXXXXX";
// Application (client) ID:
const clientId = "XXXXXX-XXXX-XXXX-XXXX-XXXXXXXXXXXX";
// Application ID URI: (Of the API!)
const applicationIdUri_api= "api://my-app-api/access_as_user";
export const { OidcProvider, useOidc, getOidc } = createReactOidc({
issuerUri: `https://login.microsoftonline.com/${directoryId}/v2.0`,
clientId,
scopes: ["profile", applicationIdUri_api],
homeUrl: import.meta.env.BASE_URL
});npx degit https://github.com/keycloakify/oidc-spa/examples/tanstack-router-file-based oidc-spa-tanstack-router
cd oidc-spa-tanstack-router
cp .env.local.sample .env.local
# Uncomment the Microsoft Entra ID section and comment out the Keycloak section.
# Update the values with your own.
yarn
yarn devAdmin Consent Display Name: "JWT Access Token"
Admin Consent Description: "Ensure issuance of a JWT Access Token"
User Consent Display Name: "View your basic profile"
User Consent Description: "Allows the app to see your basic profile (e.g., name, picture, user name, email address)"
State: Enabled
https://login.microsoftonline.com/<tenant>/oauth2/v2.0/authorize (configurable via External ID / B2C custom domain)https://<tenant>.us.auth0.com/authorize (configurable via Auth0 Custom Domains)
https://accounts.google.com/o/oauth2/v2/auth (not configurable)
accounts.google.com. You cannot host it under your domain. If you need Google login, consider fronting multiple IdPs with an aggregator like Keycloak, Auth0 or Clerk that itself lives under your domain.Do your security headers allow self‑iframes?
Yes → You are set.
No → Either relax to frame-ancestors 'self' or stick to "full page redirect".
Do you host multiple OIDC clients in one page?
Yes → Strongly prefer iframe restoration to avoid redirect loops and persistence.

Explicitly check whether the user is logged in or not.
But if your app has no public pages, all of this can be simplified. Auto Login lets you assume the user is always logged in, and that every page implicitly requires authentication.
Here the oidc object will always be of type Oidc.UserLoggedIn, there is no need to check if( oidc.isUserLoggedIn ) anywhere.
import { createOidc } from "oidc-spa/core";

const oidc = await createOidc({
    // ...
    autoLogin: true
}); import { oidcSpa } from "oidc-spa/react-tanstack-start";
export const {
bootstrapOidc,
useOidc,
getOidc,
oidcFnMiddleware,
oidcRequestMiddleware,
- enforceLogin
} = oidcSpa
.withExpectedDecodedIdTokenShape({ /* ... */ })
.withAccessTokenValidation({ /* ... */ })
import { HeadContent, Scripts, createRootRoute } from "@tanstack/react-router";

import Header from "@/components/Header";
import { AutoLogoutWarningOverlay } from "@/components/AutoLogoutWarningOverlay";
import
You can remove all the assertin your oidc component, the components specifically for the not logged in state can be removed.
You can remove the assert: "user logged in" from oidcFnMiddleware and oidcRequestMiddleware:
You can remove all the beforeLoad: enforceLogin:
For all the components that are within the <OidcInitializationGate /> you know that hasInitCompleted will be true so you can assert it to narrow down the type:
You can then proceed to remove all the usage of withLoginEnforced and enforceLogin throughout your codebase.
You can also remove all the assetion of the login state of the user:
All the components with useOidc({ assert: "user not logged in" }); can be removed.
All the handling for the user not logged in state can be removed.
You can remove the usage of Oidc.enforceLoginGuard:
The great thing about JWT validation is that it works offline, there’s no need to contact your authorization server every time to ask “Is this token valid and issued by you?”
oidc-spa (server) simply fetches the public key published by your IdP once, then uses it to verify that each incoming token: • was signed by the IdP, • targets the expected audience, and • hasn’t expired.
This is a huge advantage for edge runtimes, since identity and authorization can be established locally no external round trips before executing user-specific logic.
To authorize certain routes or actions, you can perform additional checks on claims like groups or realm_access.roles.
And because access tokens issued through the Authorization Code Flow + PKCE are short-lived (typically 5 minutes or less), decoupling session lifetime from token validity isn’t an issue in practice.
Let’s say we have a Node.js REST API built with Express or Hono. We’ll create a function that takes an access token (and optionally a required role) and performs the following checks:
✅ Validates that the token was issued by the expected IdP.
✅ Ensures the token is still valid (not expired or tampered with).
✅ Confirms the audience matches this specific API — meaning the token was minted for it.
✅ Checks that the user has the required role, if one is specified.
If any of these conditions fail, we throw a specialized Hono error, which will cause the HTTP response to return 401 Unauthorized.
If the token passes all checks, the function returns the user’s ID (sub claim), allowing the rest of your API logic to identify who made the request.
Let's create a oidc.ts file:
Then you can enforce that some endpoints of your API requires the user to be authenticated, in this example we use Hono:
This is a kitchen think example with the following stack:
Vite
A Todos Rest API implemented with Node and Hono
The app is live here:
The frontend (Vite project):
The backend Node Todos App REST API with Express and Hono:
In frontend-centric apps, you often need to call several APIs (resource servers), for example:
Your own REST API
Amazon S3
HashiCorp Vault
…
You can proxy those calls through your backend using a service account. That is a valid approach, but many architectures prefer to keep the backend light and stateless, and to concentrate logic in the frontend to lower infra cost and improve responsiveness.
The challenge is that you should not reuse a single access token across different APIs. Even if it “works,” it is a poor security posture and will usually fail in practice because claims differ per API.
Access tokens carry claims that describe who the user is, who the token is for, and what permissions it grants.
Example:
aud (audience) identifies the intended resource server.
sub is the user identifier.
Other claims (such as groups, scope, or custom claims) express authorization details.
Most OAuth-protected APIs require a specific audience and expect claims to be formatted in a particular way. These expectations often differ between APIs.
Do not send the same access token to every resource server. Instead, configure your IdP so the client can obtain distinct access tokens for each target API, each token crafted exactly as that API expects.
In the ideal case, oidc-spa would support:
Your IdP would let you declare APIs independently and authorize which OIDC clients can request tokens for each API. Some providers like Auth0 or Microsoft EntraID support this pattern but keycloak do not and since it's the de facto standard OpenID Connect server, we intentionally align with Keycloak’s capabilities. We therefore do not support features that Keycloak does not support as of today. This avoids exposing APIs that would not work for most deployments.
Keycloak does not yet implement RFC 8707. In Keycloak’s interpretation, when you declare an OIDC client you effectively couple an application with a resource server. To talk to multiple resource servers, you declare multiple clients in the same realm, all sharing your app’s Valid Redirect URI.
Example:
clientId: "myapp", valid redirect URI: https://myapp.my-company.com/
clientId: "myapp-vault", valid redirect URI: https://myapp.my-company.com/
clientId: "myapp-s3", valid redirect URI: https://myapp.my-company.com/
For each client, configure protocol mappers so the issued access token matches the target API’s expectations.
This limitation means that even if your IdP (Auth0, Clerk...) supports declaring APIs independently, you will still set things up this way to work with oidc-spa today.
Once your clients exist, instantiate them side by side. oidc-spa fully supports multi-client usage.
Below is an example “My Secrets” page that exchanges an OIDC access token for a Vault token and then fetches the caller’s secrets. The example uses React, but the important parts use oidc-spa/core, so you can adapt it to your framework of choice.
That is all you need for multi-API access with per-API tokens.
The first time you call createOidc() you may get a full page redirect if silent session restoration via iframe is not available. This is the default on localhost in oidc-spa.
Also note that, if you configure more than one client AND iframe session restoration is not possible, oidc-spa will persist tokens in sessionStorage to avoid redirect loops. This relaxes the default security guarantees.
To remediate:
(For production) Put your IdP authorization endpoint on the same parent domain as your app whenever possible.
For a better dev experience allow third-party cookies in your local server and explicitely set sessionRestorationMethod: "iframe", by default it's set to "auto" mening that it will only use iframe if it knows that cookies won't be blocked, and oidc-spa can't know that in localhost.
More info and detailed instructions:
issuerUriIn Keycloak, the OIDC issuer URI follows this format:
https://<KC_DOMAIN><KC_RELATIVE_PATH>/realms/<REALM_NAME>
<KC_DOMAIN>: The domain where your Keycloak server is hosted (e.g., auth.my-company.com).
<KC_RELATIVE_PATH>: The subpath under which Keycloak is hosted. In recent versions, this is an empty string (""). In older versions, it was "/auth".
Check your Keycloak server configuration; this parameter is typically set using an environment variable:
Example: -e KC_HTTP_RELATIVE_PATH=/auth
<REALM_NAME>: The name of your realm (e.g., myrealm). 🔹 Important: Always create a dedicated realm for your organization—never use the master realm. To create a new realm:
Open https://<KC_DOMAIN><KC_RELATIVE_PATH>/admin/master/console.
Log in as an administrator.
Click on the realm selector in the top-left corner.
Click "Create a new Realm"
The clientId is usually something like 'myapp'. Follow these steps to create a suitable client for your SPA:
Open https://<KC_DOMAIN><KC_RELATIVE_PATH>/admin/master/console.
Log in as an administrator.
Select your realm from the top-left dropdown.
In the left panel, click Clients.
Click Create Client.
Enter a Client ID, for example, myapp, and click Next.
Ensure Client Authentication is off, and Standard Flow is enabled. Click Next.
Set two Valid Redirect URIs, ensure both URLs end with /:
https://<APP_DOMAIN><BASE_URL>
http://localhost:<DEV_PORT><BASE_URL>
Click Save, and you're done! 🎉
One important policy to define is how often users need to re-authenticate when visiting your site.
For security-critical apps, users should log in each visit and be logged out after inactivity.
Why? Users accessing sensitive applications should not remain authenticated indefinitely, especially if they step away from their device. The session idle timeout ensures automatic logout after inactivity.
Steps to enforce this policy:
Disable "Remember Me":
Select your realm.
Navigate to Realm Settings → Login.
Set "Remember Me" to Off.
Configure session timeout:
Go to Realm Settings → Sessions.
Set SSO Session idle: 5 minutes (ensures users are logged out after 5 minutes of inactivity).
Optionally, display a logout countdown before automatic logout:
For apps where users should remain logged in for weeks or months (e.g., YouTube-style behavior):
Enable "Remember Me":
Select your realm.
Navigate to Realm Settings → Login.
Set "Remember Me" to On.
Configure session timeout:
Users without "Remember Me" will need to log in every 2 weeks:
Set Session idle timeout: 14 days.
By default, Keycloak does not allow users to delete their accounts.
If you implement a delete account button, users will see an "Action not permitted" error.
Enabling Account Deletion:
Navigate to Authentication → Required Actions.
Enable "Delete Account".
Go to Realm Settings → User Registration → Default Roles.
Click Assign Role, filter by client, select Delete Account, and assign it.
To test your configuration:
You can customize this behavior (toast, inline banner, maintenance page, retry, etc.) or surface an error page if that fits your UX.
import { createOidc } from "oidc-spa/core";

const oidc = await createOidc(...);

if( !oidc.isUserLoggedIn ){
    // User isn’t logged in: allow the app to render public pages and stop here.
    return;
IdP always provide a user account page that let users, update their password, account information, manage their session. If you are using Keycloak you can generate the link to the Account Console with:
There is thee main actions:
UPDATE_PASSWORD: Enables the user to change their password.
UPDATE_PROFILE: Enable the user to edit teir account information such as first name, last name, email, and any additional user profile attribute that you might have configured on your Keycloak server.
delete_account: (In lower case): This enables the user to delete he's account. You must enable it manually on your Keycloak server Admin console. See .
Let's, as an example, how you would implement an update password button:
bootstrapOidc({ // or createOidc({
  // "auto" (default) | "iframe" | "full page redirect"
  sessionRestorationMethod: "auto"
});sessionRestorationMethod: "full page redirect"/**
* Controls how session restoration is handled.
* "auto" picks the best strategy at runtime.
*/
sessionRestorationMethod?: "iframe" | "full page redirect" | "auto";
/**
* @deprecated Use `sessionRestorationMethod: "full page redirect"` instead.
*/
noIframe?: boolean;import { useOidc } from "@/oidc";
-function AuthButtons() {
- const { hasInitCompleted, isUserLoggedIn } = useOidc();
-
- if (!hasInitCompleted) {
- return null;
- }
-
- return isUserLoggedIn ? <LoggedInAuthButton /> : <NotLoggedInAuthButton />;
-}
-
-function LoggedInAuthButton() {
- const { logout } = useOidc({ assert: "user logged in" });
-
- return (
- <button
- onClick={() => logout({ redirectTo: "home" })}
- >
- Logout
- </button>
- );
-}
-
-function NotLoggedInAuthButton() {
- const { login, issuerUri } = useOidc({ assert: "user not logged in" });
-
- return (
- <div className="flex items-center gap-2">
- <button
- onClick={() => login()}
- >
- Login
- </button>
- </div>
- );
-}
+function AuthButtons() {
+
+ const { isOidcReady, logout } = useOidc();
+
+ if (!isOidcReady) {
+ return null;
+ }
+
+ return (
+ <button
+ onClick={() => logout({ redirectTo: "home" })}
+ >
+ Logout
+ </button>
+ );
+}-oidcFnMiddleware({ assert: "user logged in" })
+oidcFnMiddleware()
-oidcRequestMiddleware({ assert: "user logged in" })
+oidcRequestMiddleware() export const Route = createFileRoute("/demo/start/api-request")({
- beforeLoad: enforceLogin,
loader: async () => { },
pendingComponent: () => <Spinner />,
component: Home
});-const { ... } = useOidc({ assert: "user logged in" });
+const { ... } = useOidc({ assert: "ready" });import { createOidcBackend } from "oidc-spa/backend";
import { z } from "zod";
import { HTTPException } from "hono/http-exception";
const zDecodedAccessToken = z.object({
sub: z.string(),
aud: z.union([z.string(), z.array(z.string())]),
realm_access: z.object({
roles: z.array(z.string())
})
// Some other info you might want to read from the accessToken, example:
// preferred_username: z.string()
});
export type DecodedAccessToken = z.infer<typeof zDecodedAccessToken>;
export async function createDecodeAccessToken(params: {
issuerUri: string;
audience: string
}) {
const { issuerUri, audience } = params;
const { verifyAndDecodeAccessToken } = await createOidcBackend({
issuerUri,
decodedAccessTokenSchema: zDecodedAccessToken
});
function decodeAccessToken(params: {
authorizationHeaderValue: string | undefined;
requiredRole?: string;
}): DecodedAccessToken {
const { authorizationHeaderValue, requiredRole } = params;
if (authorizationHeaderValue === undefined) {
throw new HTTPException(401);
}
const result = verifyAndDecodeAccessToken({
accessToken: authorizationHeaderValue.replace(/^Bearer /, "")
});
if (!result.isValid) {
switch (result.errorCase) {
case "does not respect schema":
throw new Error(`The access token does not respect the schema ${result.errorMessage}`);
case "invalid signature":
case "expired":
throw new HTTPException(401);
}
}
const { decodedAccessToken } = result;
if (requiredRole !== undefined && !decodedAccessToken.realm_access.roles.includes(requiredRole)) {
throw new HTTPException(401);
}
{
const { aud } = decodedAccessToken;
const aud_array = typeof aud === "string" ? [aud] : aud;
if (!aud_array.includes(audience)) {
throw new HTTPException(401);
}
}
return decodedAccessToken;
}
return { decodeAccessToken };
}import { z, createRoute, OpenAPIHono } from "@hono/zod-openapi";
import { serve } from "@hono/node-server"
import { HTTPException } from "hono/http-exception";
import { getUserTodoStore } from "./todo";
import { createDecodeAccessToken } from "./oidc";
(async function main() {
const { decodeAccessToken } = await createDecodeAccessToken({
// Here example with Keycloak but it work the same with
// any provider as long as the access token is a JWT.
issuerUri: "https://auth.my-company.com/realms/myrealm",
audience: "account" // default audience in Keycloak
});
const app = new OpenAPIHono();
{
const route = createRoute({
method: 'get',
path: '/todos',
responses: {/* ... */}
});
app.openapi(route, async c => {
const decodedAccessToken = decodeAccessToken({
authorizationHeaderValue: c.req.header("Authorization")
});
const todos = await getUserTodoStore(decodedAccessToken.sub).getAll();
return c.json(todos);
});
}
const port = parseInt(process.env.PORT);
serve({
fetch: app.fetch,
port
})
console.log(`\nServer running. OpenAPI documentation available at http://localhost:${port}/doc`)
})();{
"aud": "https://api1.example.com",
"sub": "xxxxxx",
"groups": ["staff"]
}getAccessToken({ resource: "https://api1.example.com" })import { oidcSpa } from "oidc-spa/react-spa";
export const { bootstrapOidc, useOidc, getOidc, enforceLogin } = oidcSpa.createUtils();
bootstrapOidc({
implementation: "real",
issuerUri: "https://auth.my-company.com/realms/myrealm",
clientId: "myapp",
// sessionRestorationMethod: "iframe" // See note below
});import { getOidc, enforceLogin } from "~/oidc";
// Use the core API directly because we do not need framework helpers
// only to request an access token.
import { createOidc } from "oidc-spa/core";
let cache: { oidcAccessToken_vault: string; vaultToken: string } | undefined;
export async function clientLoader(params: Route.ClientLoaderArgs) {
// Ensure the user session is already established with the IdP.
await enforceLogin(params);
// Initialize the Vault-specific OIDC client.
// Instances are memoized per issuer/client pair.
const { getTokens: getOidcTokens_vault } = await createOidc({
issuerUri: (await getOidc()).issuerUri, // reuse the same realm
clientId: "myapp-vault", // dedicated client for Vault
autoLogin: true, // silent login through shared realm session
// sessionRestorationMethod: "iframe"
});
// Retrieve the access token issued for the Vault client.
const { accessToken: oidcAccessToken_vault } = await getOidcTokens_vault();
const vaultBaseUrl = "https://vault.example.com";
// Exchange the OIDC access token for a Vault token.
const vaultToken = await (async () => {
if (cache?.oidcAccessToken_vault === oidcAccessToken_vault) {
return cache.vaultToken;
}
const vaultToken = await fetch(`${vaultBaseUrl}/v1/auth/jwt/login`, {
method: "POST",
headers: { "Content-Type": "application/json" },
body: JSON.stringify({
role: "web-app",
jwt: oidcAccessToken_vault
})
})
.then(r => r.json())
.then(o => o.auth.client_token as string);
cache = { oidcAccessToken_vault, vaultToken };
return vaultToken;
})();
// Fetch the caller’s secret values using the Vault token.
const userSecrets = await fetch(`${vaultBaseUrl}/v1/secret/data/users/me`, {
headers: { "X-Vault-Token": vaultToken }
})
.then(r => r.json())
.then(o => o.data.data as Record<string, string>);
return { userSecrets };
}
export default function MySecrets() {
const { userSecrets } = useLoaderData<typeof clientLoader>();
return (
<dl>
{Object.entries(userSecrets).map(([key, value]) => (
<div key={key} className="space-y-1">
<dt>{key}</dt>
<dd>{value}</dd>
</div>
))}
</dl>
);
}const { ... } = createOidc({
issuerUri: "...",
clientId: "...",
// ...
});npx degit https://github.com/keycloakify/oidc-spa/examples/tanstack-router-file-based oidc-spa-tanstack-router
cd oidc-spa-tanstack-router
cp .env.local.sample .env.local
# Edit the .env.local file to reflect your configuration
yarn
yarn devimport { useOidc } from "@/oidc";
import { useEffect } from "react";
function AuthButtons() {
const {
isUserLoggedIn,
login,
logout,
oidcInitializationError
} = useOidc();
useEffect(() => {
if (oidcInitializationError) {
// Helps distinguish misconfiguration vs. temporary auth-server outage.
console.log(oidcInitializationError.isAuthServerLikelyDown);
// Developer-only diagnostic with likely cause and fix.
// Do not display this to end users.
console.log(oidcInitializationError.message);
}
}, []);
if (isUserLoggedIn) {
return <button onClick={() => logout({ redirectTo: "home" })}>Logout</button>;
}
return (
<button
onClick={() => {
if (initializationError) {
// Keep the UX calm and actionable.
alert("Can't login now, try again later");
return;
}
login({ ... });
}}
>
Login
</button>
);
}
}import { useOidc } from "~/oidc";
import { useEffect } from "react";
function AuthButtons() {
const { isUserLoggedIn, login, logout, initializationError } = useOidc();
useEffect(() => {
if (initializationError) {
// Helps distinguish misconfiguration vs. temporary auth-server outage.
console.log(initializationError.isAuthServerLikelyDown);
// Developer-only diagnostic with likely cause and fix.
// Do not display this to end users.
console.log(initializationError.message);
}
}, []);
if (isUserLoggedIn) {
return <button onClick={()=> logout({ redirectTo: "home" })}>Logout</button>;
}
return (
<button onClick={() => {
if (initializationError) {
// Keep the UX calm and actionable.
alert("Can't login now, try again later")
return;
}
login({ ... });
}}>
Login
</button>
);
}@Component({
selector: 'app-root',
templateUrl: './app.html',
})
export class App {
oidc = inject(Oidc);
constructor() {
if (!this.oidc.isUserLoggedIn && this.oidc.initializationError) {
const { initializationError } = this.oidc;
// Helps distinguish a misconfiguration from a temporary auth-server outage.
console.log(initializationError.isAuthServerLikelyDown);
// Developer-only diagnostic with the likely cause and fix.
// Do not display this to end users.
console.log(initializationError.message);
}
}
login() {
if (this.oidc.isUserLoggedIn) {
throw new Error('Control flow error: The user is already logged in');
}
if (this.oidc.initializationError) {
// Keep the UX calm and actionable.
alert("Can't login now, try again later");
return;
}
return this.oidc.login();
}
}import { createKeycloakUtils } from "oidc-spa/keycloak";
const keycloakUtils = createKeycloakUtils({ issuerUri: oidc.params.issuerUri });
const accountLinkUrl = keycloakUtils.getAccountUrl({
clientId: oidc.params.clientId,
validRedirectUri: oidc.params.validRedirectUri,
locale: "en" // Optional
});const { issuerUri, clientId, validRedirectUri } = useOidc();
const keycloakUtils = createKeycloakUtils({ issuerUri: oidc.params.issuerUri });
const accountLinkUrl = keycloakUtils.getAccountUrl({
clientId: oidc.params.clientId,
validRedirectUri: oidc.params.validRedirectUri,
locale: "en" // Optional
});import { Oidc } from './services/oidc.service';
@Component({
selector: 'app-root',
templateUrl: './app.html',
})
export class App {
oidc = inject(Oidc);
keycloakUtils = createKeycloakUtils({
issuerUri: this.oidc.issuerUri,
});
accountUrl = this.keycloakUtils.getAccountUrl({
clientId: this.oidc.clientId,
validRedirectUri: this.oidc.validRedirectUri,
locale: "en" // Optional
})
}


 export const {
     bootstrapOidc,
     useOidc,
     getOidc,
     OidcInitializationGate
-    withLoginEnforced,
-    enforceLogin
 } = oidcSpa
     .withExpectedDecodedIdTokenShape({ /* ... */ })
+    .withAutoLogin()
.createUtils();- useOidc({ assert: "user logged in" });
+ useOidc();@Injectable({ providedIn: 'root' })
export class Oidc extends AbstractOidcService<DecodedIdToken> {
// ...
override autoLogin = true;
}-@if (oidc.isUserLoggedIn) {
<div>
<span>Hello {{ oidc.$decodedIdToken().name }}</span>
<button (click)="oidc.logout({ redirectTo: 'home' })">Logout</button>
</div>
-} @else {
-<div>
- <button (click)="oidc.login()">Login</button>
-</div>
-}-canActivate: [Oidc.enforceLoginGuard],
//...
canActivate: [
async (route) => {
const oidc = inject(Oidc);
const router = inject(Router);
- await Oidc.enforceLoginGuard(route);
//...
},
],import { createOidc } from "oidc-spa";
import { parseKeycloakIssuerUri } from "oidc-spa/tools/parseKeycloakIssuerUri";
const oidc = await createOidc({ ... });
if( oidc.isUserLoggedIn ){
// Function to invoke when the user click on your "change my password" button.
const updatePassword = ()=>
oidc.goToAuthServer({
extraQueryParams: {
kc_action: "UPDATE_PASSWORD"
}
});
// NOTE: This is optional, it enables you to display a feedback message
// when the user is redirected back to your application after completing
// or canceling the action.
if(
oidc.backFromAuthServer?.extraQueryParams.kc_action === "UPDATE_PASSWORD"
){
switch(oidc.backFromAuthServer.result.kc_action_status){
case "canceled":
alert("You password was not updated");
break;
case "success":
alert("Your password has been updated successfuly");
break;
}
}
}
// Url for redirecting users to the keycloak account console.
const keycloakAccountUrl = parseKeycloakIssuerUri(oidc.params.issuerUri)
.getAccountUrl({
clientId: params.clientId,
backToAppFromAccountUrl: `${location.href}${import.meta.env.BASE_URL}`
});
import { useOidc } from "@/oidc";

function ProtectedPage() {
    // Here we can safely assume that the user is logged in.
    const { goToAuthServer, backFromAuthServer, params } = useOidc({ assert: "user logged in" });

    return (
        <>
            <button
                onClick={() =>
                    goToAuthServer({
                        extraQueryParams: { kc_action: "UPDATE_PASSWORD" }
                    })
                }
            >
                Change password
            </button>
            {/*
            Optionally you can display a feedback message to the user when they
            are redirected back to the app after completing or canceling the
            action.
            */}
            {backFromAuthServer?.extraQueryParams.kc_action === "UPDATE_PASSWORD" && (
                <p>
                    {(()=>{
                        switch(backFromAuthServer.result.kc_action_status){
                            case "success":
                                return "Password successfully updated";
                            case "cancelled":
                                return "Password unchanged";
                        }
                    })()}
                </p>
            )}
        </>
    );
}
upsatePassword = ()=> this.oidc.goToAuthServer({
    extraQueryParams: { kc_action: "UPDATE_PASSWORD" }
});@if( oidc.backFromAuthServer?.extraQueryParams.kc_action === "UPDATE_PASSWORD" ){
@if ( oidc.backFromAuthServer.result.kc_action_status === "success" ){
<p>Password successfully updated</p>
} @else {
<P>Password unchanged</p>
}
}
Parameters:
<APP_DOMAIN>: Examples: https://my-company.com or https://app.my-company.com. 🔹 For beter performances ensure <APP_DOMAIN> and <KC_DOMAIN> share the same root domain (my-company.com). See end of third party cookies.
<BASE_URL>: Examples: "/" or "/dashboard/".
<DEV_PORT>: Example: 5173 (default for Vite's dev server, adapt to your setup).
14 days (ensures users who actively use the app don’t get logged out unnecessarily).14 days.Users who checked "Remember Me" should stay logged in for 1 year:
Set Session idle timeout (Remember Me): 365 days.
Set Session max idle timeout (Remember Me): 365 days.
Auto logout is not a feature you enable or disable in oidc-spa.
It’s a policy defined by your Identity Provider (IdP).
What oidc-spa provides is:
A mechanism to display a feedback overlay that warns users before they’re logged out due to inactivity.
Ensure they never remain stuck on a stale UI where any interaction would simply redirect them to the login page.
Monitoring of real user activity across all tabs of your application, ensuring users aren’t mistakenly marked as inactive just because they haven’t performed an action that directly contacts the IdP.
The duration before an inactive user is logged out is not configured in oidc-spa, it’s controlled by your IdP.
Depending on the platform, this policy might be named:
SSO Session Idle
Idle Session Lifetime
Inactivity Timeout
When a user logs into your application, the IdP creates a session for that user. As long as this session remains active, returning to your app (with the same browser) automatically restores it, no new login required.
Your IdP defines how long such sessions remain active:
Weeks or days → Users rarely have to log in again (e.g., Instagram, X/Twitter)
Minutes → Users must log in often or may be logged out during inactivity
oidc-spa automatically monitor user activity across tabs, mouse movement, touch events, or keyboard input.
As long as the user is active, it periodically pings the IdP to keep the session alive.
💡 Note: IdP configuration panels often include multiple session policies. For example:
SSO Session Idle: how long before the session expires if idle
SSO Session Max / Maximum Lifetime: total duration before forced expiration
Remember Me: may extend lifetime if selected and if not selected set session cookie to expire when the browser closes (not just the tab)
Guides for common providers:
Other providers: search for:
“SSO Session Idle”
To confirm that your IdP communicates its session policy correctly, enable debug logs:
Then open your browser console.
If you see:
oidc-spa: The user will be automatically logged out after X minutes of inactivity.
✅ You’ve successfully configured auto logout.
If instead you see:
oidc-spa: No refresh token, and idleSessionLifetimeInSeconds was not set, can't implement auto logout mechanism.
It means your IdP does not expose this information to clients.
In that case, you must manually specify the duration using idleSessionLifetimeInSeconds and keep it in sync with your IdP configuration. Keep reading for futher instructions.
oidc-spa provides convenient hooks to display a warning overlay (or any other UI) before the user is automatically logged out.
Then mount it in your root layout:
Then mount it near the root of your app:
“Idle Session Lifetime”
“Inactivity Timeout”
Refresh Token TTL
This section explains how to configure your application so it can begin rendering before the user’s authentication state is fully determined.
With this setup, the initial UI appears immediately, and authentication-aware components are rendered a moment later once the auth state is resolved. The result looks like this video:
import React from "react";
import ReactDOM from "react-dom/client";
import { App } from "./App";
import { OidcInitializationGate } from "~/oidc";
By default, this setup defers rendering your entire app until bootstrapOidc() has resolved, in other words, until oidc-spa has contacted your IdP and determined whether the user currently has an active session.
This is often the simplest and safest choice:
You don’t have to think about whether the auth state has settled.
There’s no risk of layout shifts.
You just need to make sure to at least .
However, for optimal performance, you can start rendering before the authentication state is resolved, letting the page appear instantly, while auth-aware components hydrate a few milliseconds later.
For example:
In this short demo, the homepage renders immediately, and components depending on authentication appear shortly after the session check completes.
You can achieve this simply by moving <OidcInitializationGate /> closer to the components that call useOidc():
First, you need to remove the root OidcInitializationGate:
Then wrap all the components that call the useOidc() hook without assertion, into <OidcInitializationGate /> or <Suspense />:
Don't forget <AutoLogoutWarningOverlay />! If you forget to wrap a single component that call useOidc(), you're all app will suspend.
The components that call useOidc({ assert: "..." }) do not need to be wrapped into OidcInitializationGate! If you are able to make an assertion, the auth state has been established already and those calls will never suspend!
You can use React’s built-in <Suspense /> instead of <OidcInitializationGate />.
This is often even better, as it lets you define a unified fallback for all your app’s asynchronous operations.
When called before the auth state is ready, useOidc() throws a Promise, which React will catch using the nearest Suspense boundary.
This means you must wrap any component that calls useOidc() in either <OidcInitializationGate /> or <Suspense />.
If you don’t, your entire app will suspend.
withLoginEnforced()Consider this:
Example:
With route components like:
<OidcInitializationGate /> at the root: simpler mental model, no layout shift.
<Suspense /> or <OidcInitializationGate /> near useOidc() calls: faster perceived load, better user experience.
Components using useOidc({ assert: "..." })
(In modern browsers, session restoration typically takes under 300 ms, so even full gating often feels instant.)
When using the oidc-spa/angular adapter, the recommended default is to let bootstrap wait for OIDC.
You do this by using your Oidc service and not opting out of provider waiting (the default).
app.config.ts
Oidc service (simple example)
With this setup, Angular only renders once bootstrapOidc()
In TanStack Start, non-blocking rendering is the default, since it's required for server rendering. However, if you find the layout shift caused by auth-aware components appearing after hydration annoying to handle, you can easily delay rendering your app until the OIDC initialization process has completed:
Then, you don't need to test anymore if oidc is ready:
createOidc({
    // ...
    debugLogs: true
});bootstrapOidc({
// ...
debugLogs: true
});Oidc.provide({
// ...
debugLogs: true
})import { createOidc } from "oidc-spa/core";
const oidc = await createOidc({
// ...
// ⚠️ Read carefully:
// Only use this if your IdP does not expose its session timeout policy.
// (Optional) Hard-code the number of seconds of inactivity before auto logout.
idleSessionLifetimeInSeconds: 300, // 5 minutes
// (Optional) Where to redirect after auto logout:
autoLogoutParams: { redirectTo: "current page" } // Default (recommended)
// autoLogoutParams: { redirectTo: "home" }
// autoLogoutParams: { redirectTo: "specific url", url: "/a-page" }
});bootstrapOidc({
// ...
// (Optional) How long before auto logout the warning overlay should appear.
// Default: 45 seconds
warnUserSecondsBeforeAutoLogout: 45,
// ⚠️ Read carefully:
// Only use this if your IdP does not expose its session timeout policy.
// (Optional) Hard-code the number of seconds of inactivity before auto logout.
idleSessionLifetimeInSeconds: 300, // 5 minutes
// (Optional) Redirect behavior after auto logout:
autoLogoutParams: { redirectTo: "current page" } // Default (recommended)
// autoLogoutParams: { redirectTo: "home" }
// autoLogoutParams: { redirectTo: "specific url", url: "/a-page" }
});export const appConfig: ApplicationConfig = {
providers: [
// ...
Oidc.provide({
// ...
// (Optional) How long before auto logout the overlay should appear.
// Default: 45 seconds
warnUserSecondsBeforeAutoLogout: 45,
// ⚠️ Read carefully:
// Only use this if your IdP does not expose its session timeout policy.
// (Optional) Hard-code the number of seconds of inactivity before auto logout.
idleSessionLifetimeInSeconds: 300, // 5 minutes
// autoLogoutParams: { redirectTo: "current page" } // Default (recommended)
// autoLogoutParams: { redirectTo: "home" }
// autoLogoutParams: { redirectTo: "specific url", url: "/a-page" }
})
]
}const { unsubscribeFromAutoLogoutCountdown } =
oidc.subscribeToAutoLogoutCountdown(({ secondsLeft }) => {
if (secondsLeft === undefined) {
// Countdown reset — user became active again
hideModal();
return;
}
if (secondsLeft > 60) {
// Logout is still far away — no warning yet
return;
}
showModal(`Are you still there? ${secondsLeft}s before auto logout.`);
});import { createOidcComponent } from "@/oidc";
export const AutoLogoutWarningOverlay = createOidcComponent({
component: () => {
const { autoLogoutState } = AutoLogoutWarningOverlay.useOidc();
// Default: starts displaying 45 seconds before auto logout
if (!autoLogoutState.shouldDisplayWarning) {
return null;
}
return (
<div className="fixed inset-0 z-50 flex items-center justify-center bg-black/70 px-4 backdrop-blur">
<div
role="alertdialog"
aria-live="assertive"
aria-modal="true"
className="w-full max-w-sm rounded-2xl border border-slate-800 bg-slate-900 p-6 text-center shadow-xl shadow-black/30"
>
<p className="text-sm font-medium text-slate-400">
Are you still there?
</p>
<p className="mt-2 text-lg font-semibold text-white">
You will be logged out in {autoLogoutState.secondsLeftBeforeAutoLogout}s
</p>
</div>
</div>
);
}
});import { HeadContent, Scripts, createRootRoute } from "@tanstack/react-router";
import Header from "@/components/Header";
import { AutoLogoutWarningOverlay } from "@/components/AutoLogoutWarningOverlay";
export const Route = createRootRoute({
head: () => ({
meta: [/* ... */],
links: [/* ... */]
}),
shellComponent: RootDocument
});
function RootDocument({ children }: { children: React.ReactNode }) {
return (
<html lang="en">
<head>
<HeadContent />
</head>
<body>
<Header />
<main>{children}</main>
<AutoLogoutWarningOverlay />
<Scripts />
</body>
</html>
);
}import { useOidc } from "~/oidc";
export function AutoLogoutWarningOverlay() {
const { autoLogoutState } = useOidc();
if (!autoLogoutState.shouldDisplayWarning) {
return null;
}
return (
<div className="fixed inset-0 z-50 flex items-center justify-center bg-black/70 px-4 backdrop-blur">
<div
role="alertdialog"
aria-live="assertive"
aria-modal="true"
className="w-full max-w-sm rounded-2xl border border-slate-800 bg-slate-900 p-6 text-center shadow-xl shadow-black/30"
>
<p className="text-sm font-medium text-slate-400">
Are you still there?
</p>
<p className="mt-2 text-lg font-semibold text-white">
You will be logged out in {autoLogoutState.secondsLeftBeforeAutoLogout}s
</p>
</div>
</div>
);
}import { AutoLogoutWarningOverlay } from "./components/AutoLogoutWarningOverlay";
export function App() {
return (
<div>
<Header />
<main>{/* ... */}</main>
<AutoLogoutWarningOverlay />
</div>
);
}<header>...</header>
<router-outlet />
@if (oidc.$secondsLeftBeforeAutoLogout()) {
<!-- Full screen overlay, blurred background -->
<div [style]="{
position: 'fixed',
top: 0,
left: 0,
right: 0,
bottom: 0,
backgroundColor: 'rgba(0,0,0,0.5)',
backdropFilter: 'blur(10px)',
display: 'flex',
justifyContent: 'center',
alignItems: 'center',
zIndex: 1000
}">
<div>
<p>Are you still there?</p>
<p>You will be logged out in {{ oidc.$secondsLeftBeforeAutoLogout() }}</p>
</div>
</div>
}If you use withLoginEnforced() it need to be wrapped as well.
Don't forget to wrap AutoLogoutWarningOverlay
Why this is nice
You do not think about “is OIDC ready”.
No layout shifts.
Tests and SSR behave predictably. (NOTE: SSR in Angular not tested yet)
For optimal performance, you can start rendering before the authentication state is fully resolved, so the page appears instantly and OIDC-aware parts “hydrate” moments later.
Example of what it can look in action:
Enable this by opting out of provider waiting in your Oidc service:
Important: Once you do this, you are responsible for placing “init boundaries” in templates, so parts of the UI that need OIDC only render once it is ready.
Use Angular’s built-in @defer with a @placeholder for instant paint:
Anywhere you read things like oidc.isUserLoggedIn, oidc.$decodedIdToken(), or values derived from issuerUri, put them behind a @defer (when oidc.prInitialized | async) (or otherwise guard them) to avoid runtime errors during the brief initialization window.
Because the component can be constructed before OIDC is initialized, compute helpers like keycloakUtils lazily:
Blocking at bootstrap (default): Oidc.provide() waits for bootstrapOidc() before Angular renders. Easiest mental model. No layout shift. Tests and SSR are straightforward.
Non-blocking: set override providerAwaitsInitialization = false in your Oidc service. Then:
Gate auth-aware UI with @defer (when oidc.prInitialized | async) { ... } @placeholder { ... }.
Access helpers like keycloakUtils via a getter so you do not touch issuerUri before init.
Guard overlays or any code that reads OIDC state.
Choose based on the UX you want. Both modes are supported.
(In modern browsers, session restoration usually completes in under ~300 ms, so even full gating often feels instant.)
 import React from "react";
 import ReactDOM from "react-dom/client";
 import { BrowserRouter } from "react-router";
 import { App } from "./App";
-import { OidcInitializationGate } from "~/oidc";
 import "./index.css";

 ReactDOM.createRoot(document.getElementById("root")!).render(
     <React.StrictMode>
-         <OidcInitializationGate>
             <BrowserRouter>
                 <App />
             </BrowserRouter>
-         </OidcInitializationGate>
     </React.StrictMode>
);import { Suspense } from "react";
import {
useOidc,
OidcInitializationGate
} from "~/oidc";
export function Header() {
return (
<header>
{/* ... */}
<OidcInitializationGate fallback={<Spinner />}>
<AuthButtons />
</OidcInitializationGate>
{/* OR */}
{/*
<Suspense fallback={<Spinner />}>
<AuthButtons />
</Suspense>
*/}
</header>
);
}
function AuthButtons() {
const { isUserLoggedIn } = useOidc();
return (
<div className="animate-fade-in">
{isUserLoggedIn ? <LoggedInAuthButtons /> : <NotLoggedInAuthButtons />}
</div>
);
}import { withLoginEnforced } from "~/oidc";
// This component can suspend when rendered (like a lazy component would)
// You must define a suspense boundary around it (or use OidcInitializationGate).
const Protected = withLoginEnforced(() => {
return <div>{/* ... */}</div>;
});
export default Protected;import { lazy, Suspense } from "react";
import { Navigate, Route, Routes } from "react-router";
import { AutoLogoutWarningOverlay } from "./components/AutoLogoutWarningOverlay";
import { Header } from "./components/Header";
import { Home } from "./pages/Home";
const Protected = lazy(() => import("./pages/Protected"));
const AdminOnly = lazy(() => import("./pages/AdminOnly"));
export function App() {
return (
<>
<Header />
<main>
<Suspense fallback={<Spinner />}>
<Routes>
<Route index element={<Home />} />
<Route path="protected" element={<Protected />} />
<Route path="admin-only" element={<AdminOnly />} />
<Route path="*" element={<Navigate to="/" replace />} />
</Routes>
</Suspense>
</main>
<Suspense>
<AutoLogoutWarningOverlay />
</Suspense>
</>
);
}import { ApplicationConfig } from '@angular/core';
import { provideRouter } from '@angular/router';
import { routes } from './app.routes';
import { Oidc } from './services/oidc.service';
export const appConfig: ApplicationConfig = {
providers: [
// This will NOT resolve until bootstrapOidc() completes.
Oidc.provide({
// ...
}),
provideRouter(routes),
],
};import { Injectable } from '@angular/core';
import { AbstractOidcService } from 'oidc-spa/angular';
export type DecodedIdToken = {
name: string;
realm_access?: { roles: string[] };
};
@Injectable({ providedIn: 'root' })
export class Oidc extends AbstractOidcService<DecodedIdToken> {
// providerAwaitsInitialization defaults to true
}import { HeadContent, Scripts, createRootRoute } from "@tanstack/react-router";
import Header from "@/components/Header";
import { AutoLogoutWarningOverlay } from "@/components/AutoLogoutWarningOverlay";
import appCss from "../styles.css?url";
import { useOidc } from "@/oidc";
export const Route = createRootRoute({
head: () => ({ /* ... */ }),
shellComponent: RootDocument
});
function RootDocument({ children }: { children: React.ReactNode }) {
const { isOidcReady } = useOidc();
return (
<html lang="en">
<head>
<HeadContent />
</head>
<body
className="min-h-screen text-white"
style={{
backgroundColor: "#0f172a",
backgroundImage: "linear-gradient(180deg, #0f172a 0%, #1e293b 50%, #0f172a 100%)"
}}
>
<div className="min-h-screen flex flex-col">
{isOidcReady && (
<>
<Header />
<main className="flex flex-1 flex-col">
<div className="flex flex-1 flex-col">{children}</div>
</main>
</>
)}
</div>
<AutoLogoutWarningOverlay />
<Scripts />
</body>
</html>
);
} function AuthButtons(props: { className?: string }) {
const { className } = props;
- const { isOidcReady, isUserLoggedIn } = useOidc();
+ const { isUserLoggedIn } = useOidc({ assert: "ready" });
- if (!isOidcReady) {
- return null;
- }
return (
<div className={["opacity-0 animate-[fadeIn_0.2s_ease-in_forwards]", className].join(" ")}>
{isUserLoggedIn ? <LoggedInAuthButton /> : <NotLoggedInAuthButton />}
</div>
);
}
function Greeting() {
- const { isOidcReady, isUserLoggedIn, decodedIdToken } = useOidc();
+ const { isOidcReady, isUserLoggedIn, decodedIdToken } = useOidc({ assert: "ready" });
- if (!isOidcReady) {
- return <> </>;
- }
return (
<span className="opacity-0 animate-[fadeIn_0.2s_ease-in_forwards]">
{isUserLoggedIn ? `Welcome back ${decodedIdToken.name}` : `Hello anonymous visitor!`}
</span>
);
}// examples/angular-kitchensink/src/app/services/oidc.service.ts
import { Injectable } from '@angular/core';
import { AbstractOidcService } from 'oidc-spa/angular';
@Injectable({ providedIn: 'root' })
export class Oidc extends AbstractOidcService {
// The provider no longer blocks Angular bootstrap
override providerAwaitsInitialization = false;
// ...
}<!-- examples/angular-kitchensink/src/app/app.html -->
<header>
<span>OIDC-SPA + Angular (Kitchen Sink)</span>
@defer (when oidc.prInitialized | async) {
<!-- Safe to read OIDC values here -->
@if (oidc.isUserLoggedIn) {
<div>
<span>Hello {{ oidc.$decodedIdToken().name }}</span>
<button (click)="oidc.logout({ redirectTo: 'home' })">Logout</button>
</div>
} @else {
<div>
<button (click)="oidc.login()">Login</button>
<button (click)="
oidc.login({
transformUrlBeforeRedirect: keycloakUtils.transformUrlBeforeRedirectForRegister,
})
">
Register
</button>
</div>
}
} @placeholder {
<span style="line-height: 1.35;">Initializing OIDC...</span>
}
</header>import { Component, inject } from '@angular/core';
import { Oidc } from './services/oidc.service';
import { createKeycloakUtils } from 'oidc-spa/keycloak';
@Component({
selector: 'app-root',
templateUrl: './app.html',
imports: [],
})
export class App {
oidc = inject(Oidc);
// Use a getter so we read issuerUri only after init
get keycloakUtils() {
return createKeycloakUtils({ issuerUri: this.oidc.issuerUri });
}
// Example: drive an "Admin only" link state
get canShowAdminLink(): boolean {
if (!this.oidc.isUserLoggedIn) return true;
const roles = this.oidc.$decodedIdToken().realm_access?.roles ?? [];
return roles.includes('admin');
}
}